ETL - Extract, Transform, Load

ETL Defined (or "What Is ETL?")

Extract-Transform-Load (ETL), is a process that is used to take information from one or more sources, normalize it in some way to some convenient schema, and then insert it into some other repository.

A common use is for data warehousing, where regular updates from one or more systems are merged and refined so that analysis can be done using more specialized tools. Typically the same process is run over and over, as new data appears in the source application(s). Other areas include:

  • Data quality
  • CRM (Customer Relationship Management)
  • BI (Business Intelligence) (see also EII)
  • Data migration
  • Application integration (see also EAI)

An ETL Use-Case and Demonstration

In order to demonstrate this, we'll use a use-case that is similar in concept. In our ETL development example, the human resources department uses a recruiting tool written using a dBase- or FoxPro-like data structure. But the employee data is stored in Microsoft SQL Server.

For reference, here is the new_empl.dbf and using an XSLT transform that reads a table and displays it as HTML, we see this:

new_empl.dbf
NAME STREET CITY STATE ZIP DEAR WHO TEL HOME BIRTH DATE HIRE DATE INSIDE
Guiles, Makenzie 145 Meadowview Road South Hadley MA 01075 Macy (413)555-6225 19770201 20060703 yes
Forbes, Andrew 12 Yarmouth Drive Holyoke MA 01040 Andy (413)555-8863 19600330 20060710 yes
Barra, Alexander 4327 Spring Drive Sandwich MA 02537 Al (508)555-8974 19861221 20060717 no
Mellon, Philip 123 Pendexter Street Boston MA 01321 Phil (781)555-4289 19700625 20060724 no
Clark, Pamela 44 Mayberry Circle Bedford MA 01730 Pam (860)555-6447 19500502 20060731 yes

Our steps will be then, to Extract, Transform, and Load.

  • The extract step will take the data from the dBASE III file and convert it into a more usable format - XML
  • The transform step will change the date format into standard ISO dates, split the name into first and last names, and assign the appropriate manager based on whether the employee is being assigned to inside sales or the external sales force.
  • The load step will take the resulting file and send it to SQL Server.
  • As a side-effect, it would be nice to get a report of data loaded.

Extracting Data from the Legacy Application

Using the XML Converters, extracting the data into something usable is very simple. Doing just File|Open, selecting the new_empl.dbf file, and choosing the dBase III converter will transform the data into XML. The URL that is used shows that anywhere XML is used, we can use also use any data source that we have an converter for. Our URL in this case is: adapter:dBase_III?file:///c:/etl/new_empl.dbf

Adding the adapter: prefix enables the converter engine.
The dBase_III portion choose the converter; there are many converters available including some very sophisticated ones such as EDI which automatically handles EDIFACT, X12, HL7, IATA, EANCOM and other EDI dialects.
The file:///c:/etl/new_empl.dbf is just the location of the file we want to use as input.

The result of this extraction will be an XML file similar to this:

<?xml version="1.0" encoding="UTF-8"?>
<table date="20060731" rows="5">
    <row row="1">
        <NAME>Guiles, Makenzie</NAME>
        <STREET>145 Meadowview Road</STREET>
        <CITY>South Hadley</CITY>
        <STATE>MA</STATE>
        <ZIP>01075</ZIP>
        <DEAR_WHO>Macy</DEAR_WHO>
        <TEL_HOME>(413)555-6225</TEL_HOME>
        <BIRTH_DATE>19770201</BIRTH_DATE>
        <HIRE_DATE>20060703</HIRE_DATE>
        <INSIDE>yes</INSIDE>
    </row>
    ...
</table>

While we are at it, let's find out what our target schema is. To do this, we use the DB to XML Data Source module. We're using the standard demonstration database that comes with SQL Server, called Northwind.

To build our map, we'll use SQL/XML, which gives us any arbitrary subset of the available data. Just the defaults are fine for this demonstration. The steps are:

  1. File|New|DB to XML Data Source
  2. Choose Microsoft SQL Server as the database type
  3. Choose your server, if not localhost
  4. Give your username and password

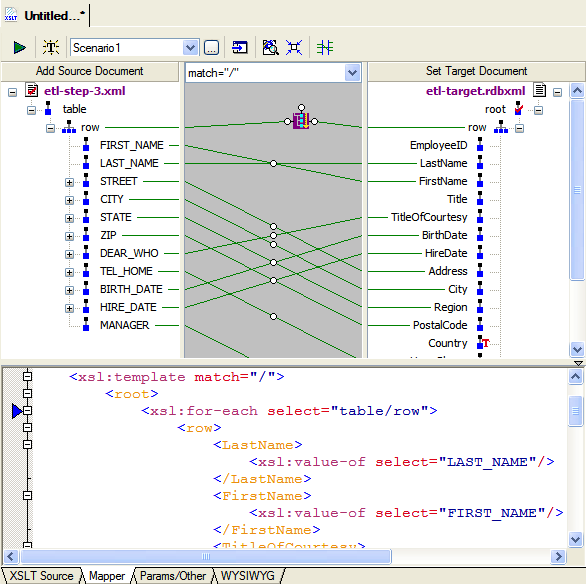
Now, you should see the schema of your database. Open the Northwind database and drag the Employees table onto the canvas, and choose "SELECT (SQL/XML)..." from the menu. Since we're also going to use this later to insert data into the database, switch to the UPDATE tab, and drag Employees again, but this time choose "INSERT...".
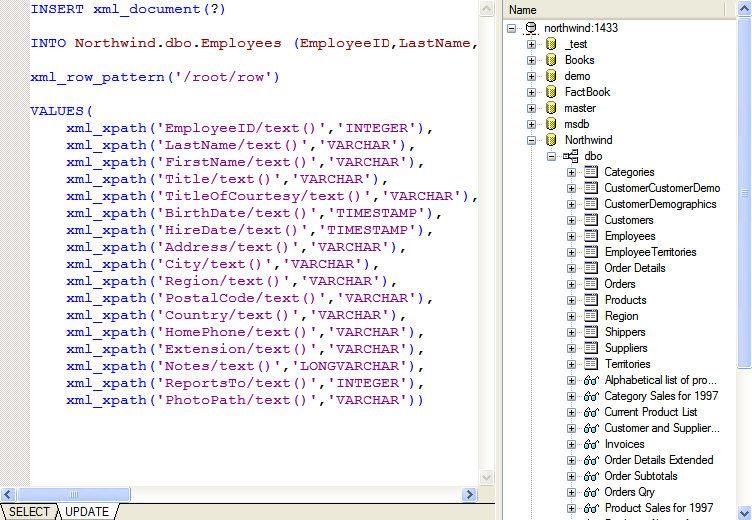
ETL: SQL/XML Insert for Extract, Transform, Load How-To (Click to enlarge)
(click to enlarge)

Now, save this as etl-target.rdbxml.

(For more details on SQL/XML, see the SQL/XML Tutorial.

Transforming Data into the Target Form

We're going to use a series of XSLT transforms to modify this. (We could do it in one large XSLT file, we're breaking it into steps for demonstration purposes. In a production ETL operation, likely each step would be more complicated, and/or would use different technologies or methods.)

  1. Convert the dates from CCYYMMDD into CCYY-MM-DD (the "ISO 8601" format) [etl-code-1.xsl]
  2. Split the first and last names [etl-code-2.xsl]
  3. Assign the manager based on inside or external sales [etl-code-3.xsl]
  4. Map the data to the new schema [etl-code-4.xsl]

For the last step above, we can use the XSLT mapper to generate the code for us. We use the output from the third step on the left, and the etl-target.rdbxml we saved earlier on the right, and draw lines connecting the corresponding fields.

ETL: XML Mapping for Extract, Transform, Load Sample

Loading Our ETL Results into the Data Repository

At this point, loading is a just matter of writing the output of the last XSLT transform step into the etl-target.rdbxml map we built earlier. But rather than run all of those steps one-by-one, we should use the XML Pipeline to automate the task.

How to Assemble the Individual ETL Steps into a Pipeline

  1. File|New|XML Pipeline
  2. Drag the four XSLT files from the File Explorer to the canvas
  3. Connect the output triangle from each to the input circle of the next
  4. Click on the output triangle of the last step, and set the "Copy to URL" property to our etl-target.rdbxml

And now we can execute our XML pipeline in the simulator it by doing XMLPipeline|Execute.

Generating ETL Java Code

Creating the core of a service is as simple as pressing the Generate button. Answer a couple of questions, and code is created. Following the instructions in the generated code will let you run it. Since Stylus Studio® contains an integrated Java IDE, you can run it right from there. Here's what a portion of the code might look like for the standard Java deployer:

public boolean init() throws Exception {

    // Create all the objects required for the pipeline
    convertToXML = new ConvertToXML("Convert to XML", getEnvironment());
    convertToXML.setAdapter("adapter:dBase_III");
    fixDates = new SaxonXSLTOperation("Fix Dates", ContentType.UNKNOWN, getEnvironment());
    nameSplit = new SaxonXSLTOperation("Name Split", ContentType.UNKNOWN, getEnvironment());
    inside_OutsideSales = new SaxonXSLTOperation("Inside/Outside Sales", ContentType.UNKNOWN, getEnvironment());
    mapSchema = new SaxonXSLTOperation("Map Schema", ContentType.XML, getEnvironment());
    reportOnOutput = new SaxonXSLTOperation("Report on output", ContentType.XML, getEnvironment());

    edge_2 = new EdgeImpl("edge_2", getEnvironment(), DataType.NODE, DataType.DOCUMENT);
    edge_3 = new EdgeImpl("edge_3", getEnvironment(), DataType.ANY, DataType.DOCUMENT);
    edge_4 = new EdgeImpl("edge_4", getEnvironment(), DataType.ANY, DataType.DOCUMENT);
    edge_5 = new EdgeImpl("edge_5", getEnvironment(), DataType.ANY, DataType.DOCUMENT);
    edge_6 = new EdgeImpl("edge_6", getEnvironment(), DataType.NODE, DataType.DOCUMENT);

    // Connect all the operation objects with edge objects.
    convertToXML.setInputUrl("new_empl.dbf", DataType.NONE);
    convertToXML.addOutputEdge(edge_2);
    fixDates.setScriptUrl("etl-step-1.xsl");
    fixDates.addInputEdge(edge_2);
    fixDates.addOutputEdge(edge_3);
    nameSplit.setScriptUrl("etl-step-2.xsl");
    nameSplit.addInputEdge(edge_3);
    nameSplit.addOutputEdge(edge_4);
    inside_OutsideSales.setScriptUrl("etl-step-3.xsl");
    inside_OutsideSales.addInputEdge(edge_4);
    inside_OutsideSales.addOutputEdge(edge_5);
    mapSchema.setScriptUrl("etl-step-4.xsl");
    mapSchema.addInputEdge(edge_5);
    mapSchema.addOutputEdge(edge_6);
    mapSchema.setOutputUrl("db:///c:/etl/etl-target.rdbxml", DataType.NODE);
    reportOnOutput.setScriptUrl("generic_table_dumper.xsl");
    reportOnOutput.addInputEdge(edge_6);
    reportOnOutput.setOutputUrl("etl-log.html", DataType.NODE);

    return true;
}

Showing the ETL Log

But we might want to see what's happening, so after that, we just have to drag and drop over our pal generic_table_dumper.xsl from earlier, and draw a line from the output of our last step to the start of this. We'll also set the output of this to be etl-log.html.

Now when we run it, we'll get the input data refined, written to the database, and have as output a log of the results that should look something like this when you open the .html file:

new_empl.dbf
Emplo yeeID Last Name First Name Title TitleOf Courtesy BirthDate HireDate Address City Reg ion Postal Code Coun try HomePhone Exten sion Notes Repo rtsTo Photo Path
10 Guiles Makenzie Macy 1977-02-01 00:00:00.0 2006-07-03 00:00:00.0 145 Meadowview Road South Hadley MA 01075 USA (413)555-6225 8
11 Forbes Andrew Andy 1960-03-30 00:00:00.0 2006-07-10 00:00:00.0 12 Yarmouth Drive Holyoke MA 01040 USA (413)555-8863 8
12 Barra Alexander Al 1986-12-21 00:00:00.0 2006-07-17 00:00:00.0 4327 Spring Drive Sandwich MA 02537 USA (508)555-8974 5
13 Mellon Philip Phil 1970-06-25 00:00:00.0 2006-07-24 00:00:00.0 123 Pendexter Street Boston MA 01321 USA (781)555-4289 5
14 Clark Pamela Pam 1950-05-02 00:00:00.0 2006-07-31 00:00:00.0 44 Mayberry Circle Bedford MA 01730 USA (860)555-6447 8

(Titles split to make the display fit better)

Our ETL Service

At this point, what we've done is build a service that can handle extracting information from one source, transforming it in a series of operations, and loading it into another source. We've then gone on and built a logging system, and even packaged up the whole set of steps as a single pipeline and generated the code to support it.

This is only the beginning. Other steps could involve conditional processing, validation of intermediate and/or final results, error handling, and conversion to other file formats. Entire pipelines can be included as modules inside of other pipelines, and parameters can be passed in to XSLT and XQuery.

See the other demonstrations for more examples on the power of XML Pipelines.

PURCHASE STYLUS STUDIO ONLINE TODAY!!

Purchasing Stylus Studio from our online shop is Easy, Secure and Value Priced!

Buy Stylus Studio Now

Try Stylus ETL Tools

Simplify ETL design with with Stylus Studio®'s award-winning ETL programming tools — Download a free trial of our today!

What's New for Stylus Studio® X16?

New XQuery & Web Services Tools, Support for MySQL, PostgreSQL, HL7 EDI, Microsoft .NET Code Generation and much more!

Why Pay More for XML Tools?

With Stylus Studio® X16 XML Enterprise Suite, you get the most comprehensive XML tool suite at one incredibly low price. Value: it's just one of many reasons why smart XML developers are choosing Stylus Studio!

Stylus Studio® EDIFACT Zone

Simplify your next legacy data integration project with the help of the EDIFACT Zone, the world's largest, free online reference covering all EDIFACT and UN/CEFACT versions.

Data Integration Technologies

Deploy your ETL applications with Stylus Studio® X16 XML Deployment Adapters featuring powerful new Data Conversion API's

 
Free Stylus Studio XML Training:
W3C Member