 Cart
Cart
|
Home > Online Product Documentation > Table of Contents > Working with Stylesheets - Getting Started Working with Stylesheets - Getting StartedThis section helps you get started working with XSLT stylesheets. To focus on stylesheets that generate HTML, see Stylesheets That Generate HTML - Getting Started. To focus on stylesheets that map XML to XML, see Using the XSLT Mapper - Getting Started. Except for the first topic, each of the following topics contains instructions for working with a sample XSLT stylesheet. You should perform the steps in each topic before you move on to the next topic. After the first topic, some steps depend on actions you performed in a previous topic. This introduction to working with stylesheets in Stylus Studio is organized as follows: Before you beginTo get started, you'll need to start Stylus Studio if you haven't already. See Starting Stylus Studio if you need help with this step. Opening a Sample StylesheetTo open the your-quotes.xsl sample XSLT stylesheet in Stylus Studio:
1. In the menu bar, select
File >
Open. Stylus Studio displays the
Open dialog box.
Alternatives:
Press Ctrl+O or click
Open
2. Navigate to the
examples\quotes directory in your Stylus Studio installation directory.
Alternative: If the Stylus Studio
3. Double-click
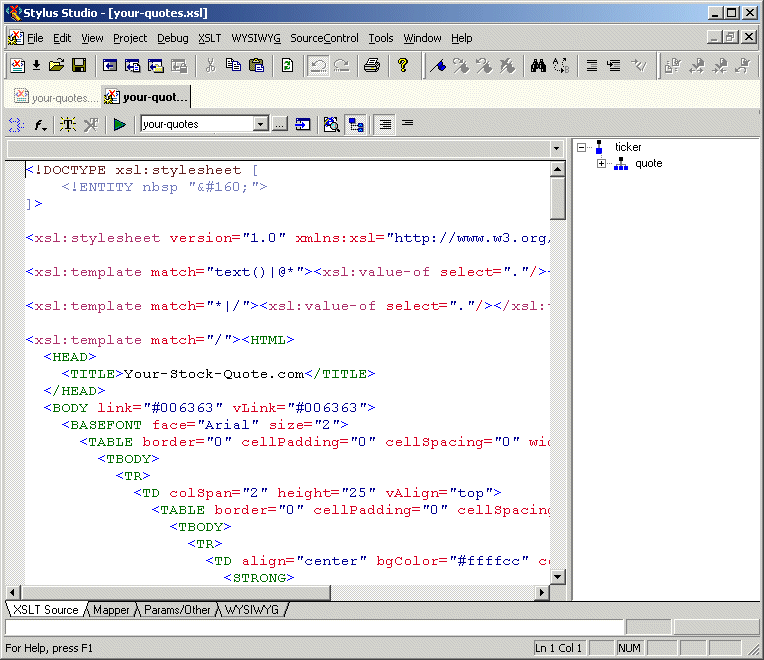
your-quotes.xsl. Stylus Studio displays the
your-quotes.xsl document in the
XSLT Source tab of the XSLT editor.
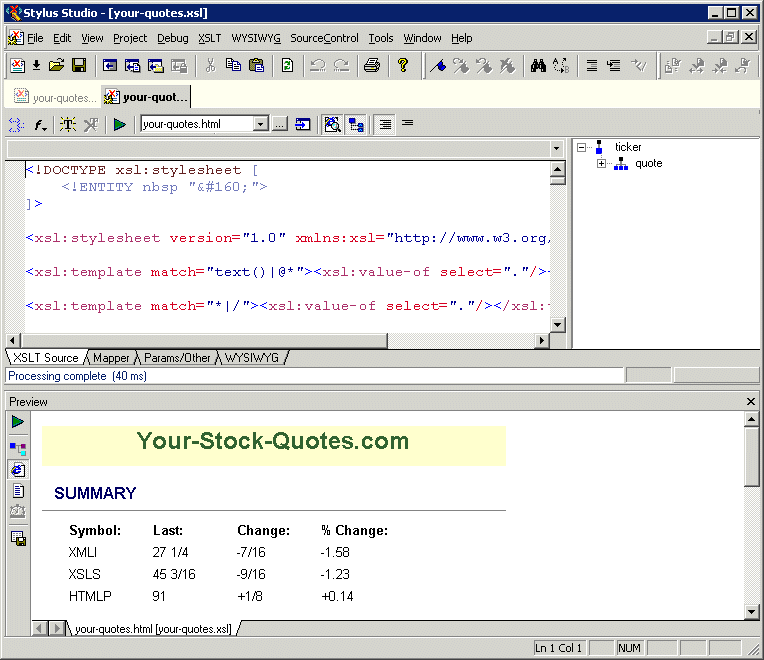
As with the XML Editor, Stylus Studio uses different colors to distinguish markup, tag names, and data in the XSLT Editor. XSLT Stylesheet Editor Quick TourWhen you use the Stylus Studio XSLT stylesheet editor, you work with XSLT stylesheets, XML source documents, and result documents. This quick tour is organized to introduce you to some of the main features for working with XSLT in Stylus Studio: Parts of the XSLT EditorThe XSLT Editor consists of four tabs that allow you to work with XSLT in different ways, based on your preferences and the functionality that you desire.
Exploring the XSLT Source Tab
This topic is part of a sequence. If
To work with the XSLT Source tab:
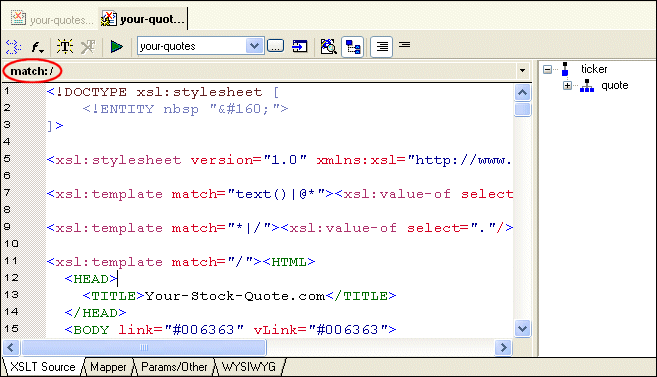
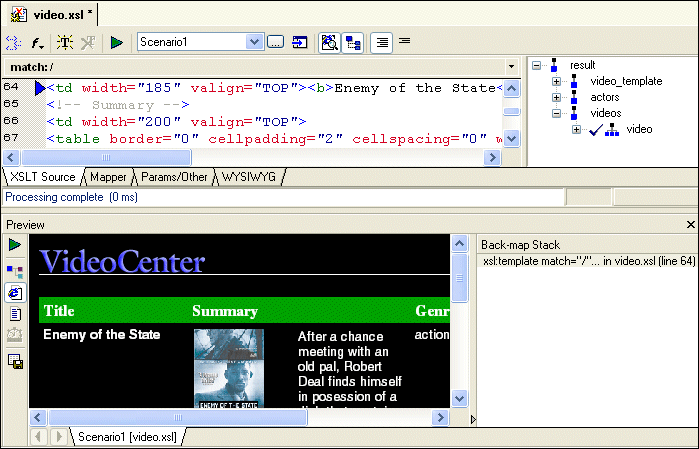
1. In the stylesheet text, click anywhere below the third
xsl:template instruction (line 11).
In the status bar just below the XSLT Editor tool bar, Stylus Studio displays match: /. This indicates that the location you clicked is inside a template that matches the root node.
2. Click in the
xsl:stylesheet instruction (line 5).
Now the status bar is blank. This instruction is not part of a template.
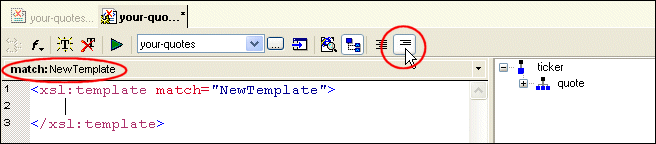
3. In the XSLT Editor tool bar, click
Add a new template
Stylus Studio inserts the following after the last template already specified in the stylesheet.
To define a new template, replace
4. In the XSLT Editor tool bar, click
Template Mode
Stylus Studio displays only the new template.
You can edit the stylesheet in either template mode or in full source mode. In template mode, Stylus Studio displays one template at a time. In full source mode, Stylus Studio displays the whole stylesheet.
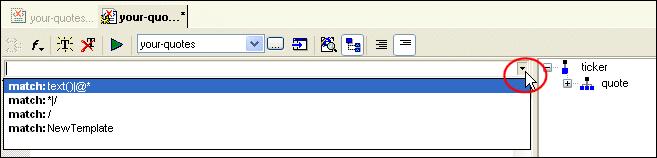
5. In the upper right corner of the editing pane, click the down arrow.
Stylus Studio displays a list of the templates in the stylesheet with their match patterns.
6. Click
match: *|/. This displays the template that matches every element and the root node.
Every stylesheet that Stylus Studio creates includes two built-in templates. One built-in template matches every element and the root node. The other built-in template matches all text and attribute nodes. See Using Stylus Studio Default Templates.
To delete a template, click the match pattern for the template you want to delete and then click
Delete template
7. Click
Full Source Mode
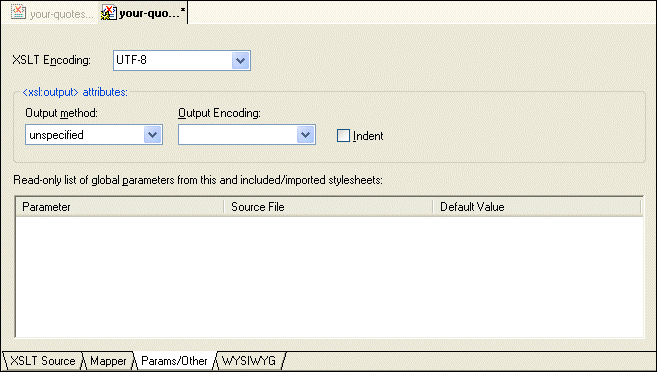
Stylus Studio displays the complete stylesheet. The cursor is at the beginning of the template that was being displayed in template mode. Exploring the Params/Other TabClick the Params/Other tab:Drop-down menus let you specify the encoding format used to store the stylesheet in Stylus Studio, as well as method and encoding output attributes. A simple grid displays the name, source URL, and default value of any global parameters used by the active stylesheet, as well as by any imported ones.
All information that you can specify in the
Params/Other tab can also be specified in the XSLT source. For example, you can specify the XSLT encoding in the processing instruction at the beginning of the stylesheet; you can specify the output method and encoding with the
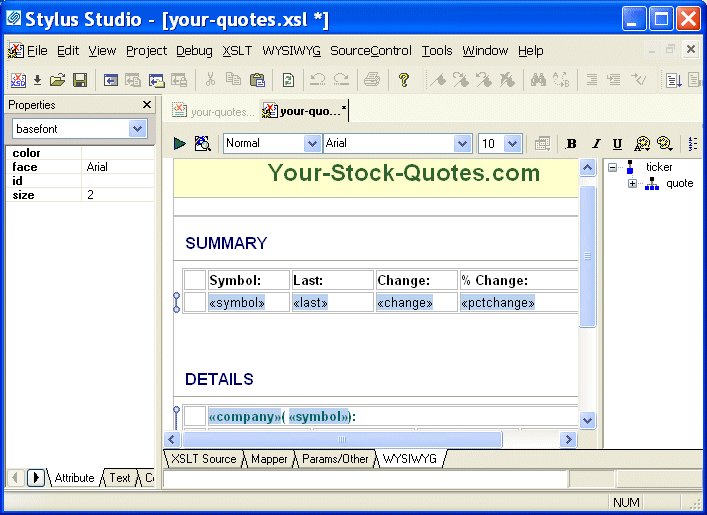
Exploring the WYSIWYG Tab
The WYSIWYG tab is a graphical XSLT editor that lets you compose XSLT by constructing the HTML document you want the XSLT to output. To work with the WYSIWYG tab:
1. Click the
WYSIWYG tab.
Stylus Studio displays a message that indicates that the output of the stylesheet is unspecified and asks you if you want to make it HTML. When the output is HTML (or XML), you can edit the stylesheet in the WYSIWYG HTML editor.
2. Click
Yes to make the stylesheet's output HTML.
Stylus Studio displays the WYSIWYG tab.
See Stylesheets That Generate HTML - Getting Started to learn more about using the XSLT WYSIWYG editor. XSLT Scenarios
This topic is part of a sequence. If
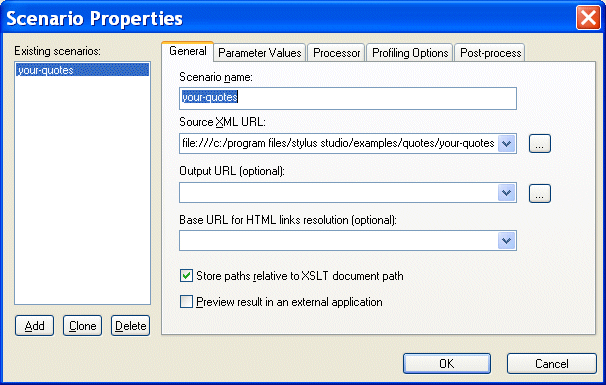
To apply a stylesheet to an XML document in Stylus Studio, you use a scenario. A scenario is a group of customizable settings that allows you to experiment with different source XML documents (that is, the XML document to which you will apply the XSLT), processors, parameter values, post-processors, and profiling settings. You can define scenarios using different settings to see how each affects document processing. Stylus Studio also supports scenarios for Web service calls, DB-to-XML Data Sources, and XQuery.
An XSLT scenario is defined by a single stylesheet-XML document pair. You can associate any number of scenarios with a stylesheet, though only one scenario can be in effect at the time the XSLT is processed. Similarly, you can associate any number of scenarios with an XML source document.
A scenario has already been created for the
To run a scenario, click Preview Result
|
|
Tip
|
|
If it is not already open, you can open the source XML document specified in a scenario by clicking
Open XML From Scenario
|
Working with Scenarios
To define additional scenarios, click the down arrow next to the scenario field in the XSLT Editor tool bar, and click Create Scenario. After you have more than one scenario, click the same down arrow to select the scenario you want to use to preview a result.
To change the properties of a scenario, or to delete a scenario, select the scenario you want to change or delete, and then click
Browse
![]() to the right of the scenario name field. Stylus Studio displays the
Scenario Properties dialog box.
to the right of the scenario name field. Stylus Studio displays the
Scenario Properties dialog box.
About Preview
When you preview a result, Stylus Studio automatically saves the changes you have made to the document. If you want to revert to the document's previous state, you can use the undo function ( Edit > Undo).
Working with a Sample Result Document
This topic is part of a sequence. If
your-quotes.xsl is not open, see
Opening a Sample Stylesheet. The sequence starts with
Exploring the XSLT Source Tab.
To work with a sample result document, follow these steps:
Using its backmapping functionality, Stylus Studio displays the template in the XSLT Editor's status bar and flags the line that generated the line you clicked with a blue pointer.
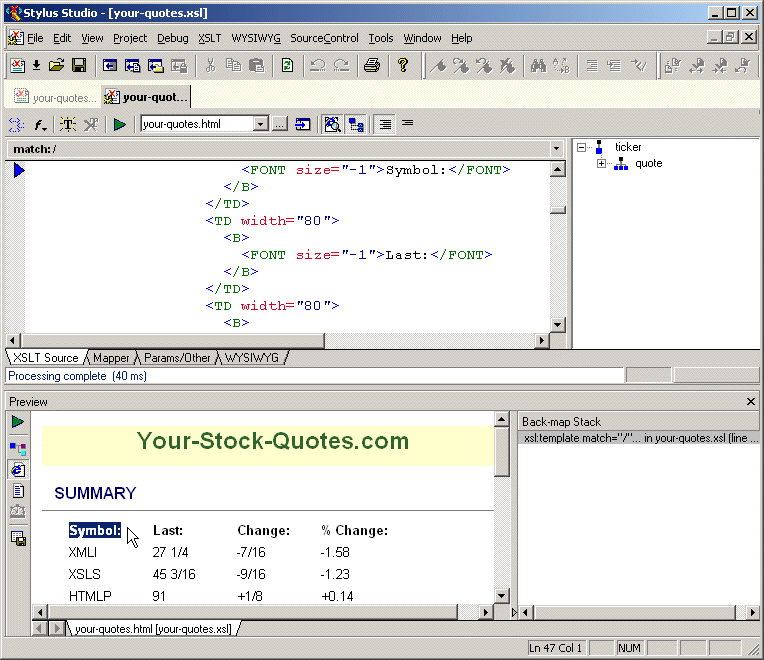
This works in reverse as well. If you click a line in a template (full source mode or template mode), Stylus Studio uses a gray background to display the HTML generated by that template.
Making a Static Web Page Dynamic by Editing XSLT
Suppose you have an XML document with a repeating element, and you want to build a Web page that displays information for each of the elements. For example, you might have a document that contains information for hundreds of books, customer accounts, sales calls, or even chemistry experiments. It is relatively easy to create an HTML file that elegantly displays the information for one element. You can then import this file into Stylus Studio, and modify it in a few steps to display all the elements in your XML document.
This section provides step-by-step instructions for converting a static Web page that displays information about one video into a dynamic Web page that displays information about many videos. The process is described in the following major steps:
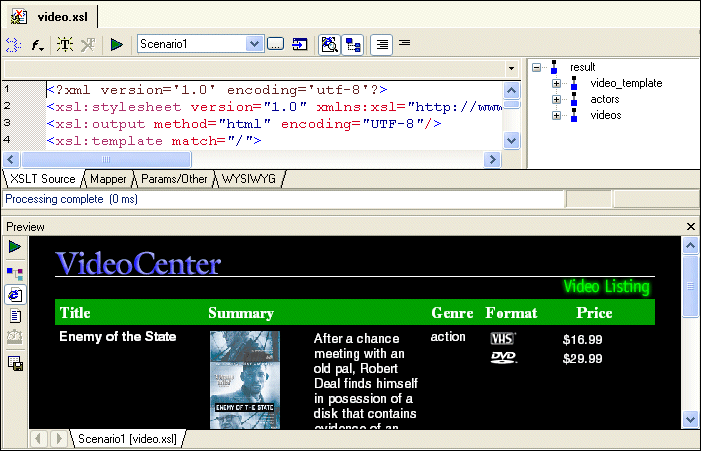
If you follow the instructions in these topics, you create the
video.xsl stylesheet. Stylus Studio includes a sample version of this stylesheet. It is
sampleVideo.xsl, and it is in the
examples\VideoCenter directory of your Stylus Studio installation directory. If the Stylus Studio
examples project is open, you can access this file from the
Project window. To open the
examples project, open
examples.prj in the Stylus Studio
examples directory.
Stylus Studio includes an additional sample stylesheet,
sample2Video.xsl. This stylesheet performs the same function as
sampleVideo.xsl, but it does not use the
xsl:apply-templates instruction. Instead, it directly executes the instructions. This results in a nicer looking WYSIWYG display.
An alternative to editing the XSLT source is to use the WYSIWYG tab to compose HTML graphically. This feature is described in Making a Static Web Page Dynamic Using the WYSIWYG Editor.
Importing a Sample HTML File
To import an HTML file:
u
movies.html, which is in the
examples\VideoCenter directory of your Stylus Studio installation directory.
Stylus Studio displays a stylesheet in the XSLT Editor. The stylesheet contains one template, which matches the root node (
<xsl:template match="/">). Stylus Studio copies all HTML markup that is in
movies.html into the
CDATA section of this template.
If you want, you can move and enlarge the XSLT editor window. If you do, leave a few inches at the bottom of the Stylus Studio window for the Preview window, which Stylus Studio will display later in this procedure.
|
Tip
|
|
An alternative to the previous four steps is to display
|
Stylus Studio displays the Scenario Properties dialog box. A scenario associates a stylesheet with an XML source document. When Stylus Studio imports an HTML file, it automatically creates the stylesheet that can generate that HTML file.
Video Scenario 1.
examples\VideoCenter directory of your Stylus Studio installation directory.
Stylus Studio displays the Save As dialog box.
video.xsl and click the
Save button.
Stylus Studio applies the new stylesheet to the
videos.xml document and displays the result in the
Preview window.
The result provides information about one video. Also, Stylus Studio displays the tree of the XML source document in a pane to the right of the stylesheet.
What to do next
To modify the stylesheet in the XSLT Source tab, continue to the next topic, Creating the video Template.
To modify the stylesheet using the WYSIWYG tab, see Making Repeating Table Rows in the WYSIWYG Editor.
Creating the video Template
This topic is part of a sequence that starts with Importing a Sample HTML File.
To create the video template, follow these steps:
|
Tip
|
|
If the source tree pane is not visible, click
Source Tree
|
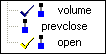
Stylus Studio creates a template that matches the
video element. The new template is empty, and it appears in the XSLT Editor pane near the end of the stylesheet (around line 159). In the source tree pane, a check appears next to
video to indicate that there is a template that matches
video.
Stylus Studio displays the template it created that matches the root element, and flags the line that generates the title. This shows you about where the HTML markup starts for a single video. In the next few steps, you are going to move the markup for the
video element into its own template.
|
Tip
|
|
When you backmap (by clicking in the output), Stylus Studio displays the Back-map Stack pane in the Preview window. This pane is discussed later in this topic. |
</TR> tag and the comment tag in the following line:
|
Tip
|
|
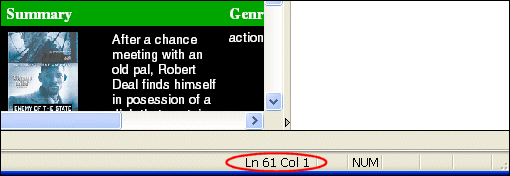
The cursor position (line and column number) is displayed in the Stylus Studio status bar, shown here:
|
video template.
video template body (line 112) and press Ctrl+V to paste the video markup into its new template.
The display no longer includes any information about the video. This is because you moved the video markup to the
video template, but you did not specify an instruction that instructs the XSLT processor to instantiate the
video template.
Instantiating the video Template
This topic is part of a sequence that starts with Importing a Sample HTML File.
To instantiate the video template, follow these steps:
video element).
<x.
Stylus Studio displays the Sense:X tag completion menu.
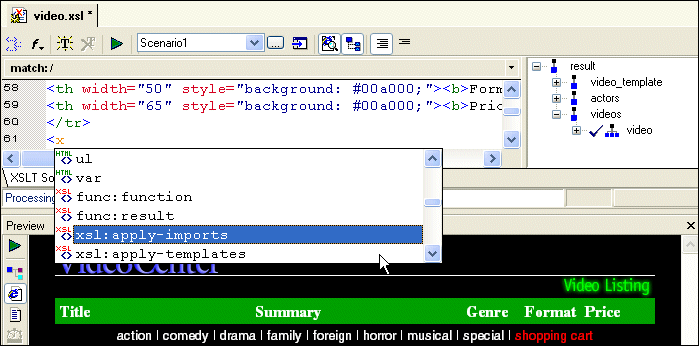
xsl:apply-templates.
Stylus Studio inserts the xsl:apply-templates instruction.
Stylus Studio again displays the choices for what you can enter.
The XSLT you have just composed selects all
video elements for processing. The complete instruction is as follows:
Now you can see that the XSLT processor does instantiate the
video template for each
video element in the XML source document. However, because the template currently contains information for Enemy of the State only, the information for that video appears for each
video element in the XML source document. You need to modify the XSLT instructions that generate the
Enemy of the State text. Each time the XSLT processor instantiates the
video template, you want it to pull in information for a different video.
Making Titles Dynamic
This topic is part of a sequence that starts with Importing a Sample HTML File.
To change the video template to display the title for each video, follow these steps:
In the
Backmap Stack pane, Stylus Studio shows you the XSLT instruction that generated the output you clicked in the result document. In the XSLT Editor pane, Stylus Studio's backmapping feature points to the line that contains
Enemy of the State.
Enemy
of
the
State.
Do not cut the
<b> and
</b> tags.
Enemy of the State, type the following instruction, or select its parts from the Sense:X tag completion lists.
	<xsl:apply-templates select="title"/>


This instructs the XSLT processor to instantiate a template that matches
        title. However, there is no such template because a
        title template is not needed in this stylesheet. The default templates provide the required operations. When the XSLT processor cannot find a template that matches
        title, it instantiates the default template that matches all elements - its template rule is
        /|*.


This default template operates on the children of the node for which it is instantiated. In this case, each time the default template is instantiated for a
        title element, it operates on the text node that is the lone child of the
        title element. Because the child node is a text node, this template instantiates the other default template, the one that matches all text nodes. This other default template copies the contents of the text node to the result document. This is how the actual title of each video gets displayed in the result.


The templates that match
        /|* and
         text()|@* are default templates in every stylesheet whether or not you or Stylus Studio explicitly include them. For additional information about how these templates work, see
        Understanding How the Default Templates Work.
Now the display for each video has a different title, but the rest of the information (the summary, the image, and so on) is that for Enemy of the State.
Making Images Dynamic
This topic is part of a sequence that starts with Importing a Sample HTML File.
To change the video template to display the image associated with each video, follow these steps:
Again, Stylus Studio's backmapping feature identifies the line in the stylesheet that generates the image.
The
Backmap Stack window now displays two
xsl:template instructions. One matches the root node and one matches
video.
id1244100 from the line Stylus Studio is pointing to.
      {@id}


The result should look like the following:


<img src="images/video/{@id}.gif" align=BOTTOM" ...


During XSLT processing, the XSLT processor replaces the attribute value template with the ID for the current video.
Stylus Studio displays a different image for each title.
Making Summaries Dynamic
This topic is part of a sequence that starts with Importing a Sample HTML File.
To change the video template to display the summary of each movie, follow these steps:
Stylus Studio uses backmapping to point to the line that generates the summary.
<xsl:apply-templates select="summary"/>


Again, the XSLT processor will use the default templates to copy the text to the result document.
Stylus Studio displays a different summary for each title.
video element (genre, rating, and so on) dynamic. But before you do that, save the work you have already done.


