|
Home > XML IDE - XML Editor > XML Editor Key Features > EDI Tools > EDIFACT to X12 or vice-versa
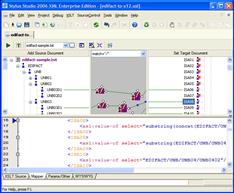
Convert EDIFACT to X12 or vice-versaNow that we have the tools to transform XML with XSLT or XQuery, convert to XML, and convert from XML, we should be able to directly build maps between EDIFACT/X12 and XML or XML and EDIFACT/X12 or now even EDI and EDI. So, let's demonstrate using the Stylus Studio® XSLT mapper to go from an EDIFACT ORDERS "Purchase order message" document in version D03B to a response X12 831 "Application Control Totals" document in release 003040. The use-case would be we need to forward the order quantity and transaction amount from a fulfillment system that speaks in a newer dialect of EDIFACT to an accounting system that speaks an older variant of X12. Here are the steps we're going to follow: (some of which are optional)
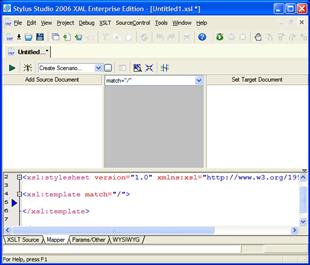
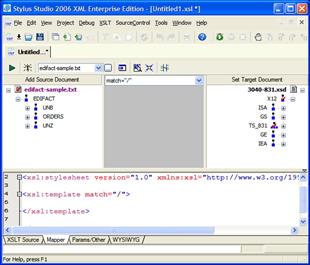
After the step-by-step EDI to EDI tutorial here, we'll show the completed XSLT file which you can download and manipulate with Stylus Studio® yourself. Generate schema for source document EDIFACT or Use instance documentFor the source of our transform, we can either use a sample EDIFACT document or use a schema representing the EDIFACT D03B ORDERS structure. Since we've got a document, we're all set. Otherwise, we could follow these steps to generate an XML Schema for an EDIFACT message. For our demonstration, we'll assume all files are local in the Generate schema for X12 as targetTo generate the X12 schema as a target, we use When the XML Schema editor opens, save the document as Open XSLT editor mapper tabStart a new XSLT map by choosing Click on the Click on the Map elementsNext we map the elements that are exactly the same between the left and the right sides. To do this, we click on the element on the left and drag it to the corresponding element on the right. You can watch the XSLT code (or XQuery, for the XQuery mapper) being updated in real-time in the bottom window. For example, (All of that can be gleaned from the EDIFACT dictionary available in the1 Stylus Studio® EDIFACT Zone, and/or the generated schemas which include documentation. X12 documentation can be purchased from DISA directly for a nominal fee, or often the subset necessary is included with the application that produces or consumes the relevant transaction set.) We proceed in this fashion until all of the fields that have corresponding entries between EDIFACT and X12 are mapped. Set literal text valuesSome of the values in the output are not going to change between runs, such as the
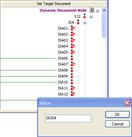
release number and encoding. We need to set those to be literal values. To do this,
right click on the node in the target tree on the right, and choose "Set Text Value"
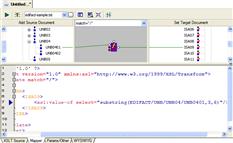
from the menu. As an example, choose Map elements requiring functionsSome of the mappings require a little more effort. For example, the dates in the
version of EDIFACT we are using are in the So, to connect from To do that, right-click on the canvas in the middle and choose Then draw a line from the A few more of those, and the mapping is completed, yielding the completed edifact-to-x12.xsl transform, which you can just copy and paste into your editor from here. Run the EDI to EDI transformOkay, press the green triangle, and look at your output. Note that the preview window itself shows the XML equivalent, you must look at the X12 EDI output by opening it in a text editor, or one of the other editors within Stylus Studio® to look at it. Below is how the X12 EDI output would look after running our transform. ISA+00+XXXXXXXXXX+00+XXXXXXXXXX+ZZ+STYLUSSTUDIO +ZZ+DATADIRECT +...
...051107+1159+U+00304+ 6002+0+T+:' GS+CT+5412345000176+4012345000094+051107+0001+1+X+003040' ST+831+SSDD1' BGN+00+BKOD99+051107+0001' DTM+007+051107+0001' N9+DD+0764569104+XPath 2.0 Programmer?'s Reference' N9+DD+0764569090+XSLT 2.0 Programmer?'s Reference' N9+DD+1861004656+Java Server Programming' N9+DD+0596006756+Enterprise Service Bus' TRN+2+1' AMT+E+39.95' AMT+E+39.95' AMT+E+39.95' AMT+E+39.95' QTY+01+25' QTY+01+25' QTY+01+16' QTY+01+10' SE+4+SSDD1' GE+22+1' IEA+1+ 6002' Post-transformation validationOne final optional step is to make sure what we're generating is in fact complete.
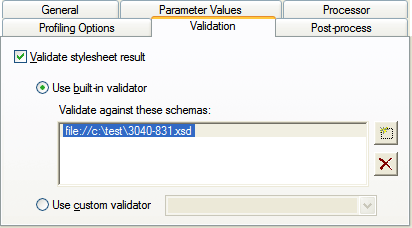
Using the same Open the
Now whenever you run the transform, the output will automatically be validated for you. EDI to XML on the Command LineJust for fun, let's see what it would take to run this same transform from the command line. All of the following would be typed just on one line: "C:\Program Files\Stylus Studio 2006 XML Enterprise Edition\bin\StylusXslt.exe"
-in converter:EDI?edifact-sample.txt
edifact-to-x12.xsl
-out converter:EDI?x12.txt
The ConclusionCongratulations! You now have all of the tools you need to map from EDIFACT to X12, or X12 to EDIFACT, or anything to or from XML. For further reading:
|
PURCHASE STYLUS STUDIO ONLINE TODAY!!Purchasing Stylus Studio from our online shop is Easy, Secure and Value Priced! Try Stylus EDI ToolsSimplify working with Electronic Data Interchange (EDI) with Stylus Studio®'s award-winning EDI Tools — Download a free trial of our today! Learn Stylus Studio in 6 MinutesCan six minutes change your life? A new action-packed online video demonstration covers how to use Stylus Studio in just six minutes! Watch this video and change the way you develop XML applications forever! Ask Someone You KnowDoes your company use Stylus Studio? Do your competitors? Engineers from over 100,000 leading companies use Stylus Studio, and now you can ask someone from your own organization about their experiences using Stylus Studio. Related XSD Features & Tutorials |
XML PRODUCTIVITY THROUGH INNOVATION ™

 Cart
Cart


