Cart
Cart
|
Home >Online Product Documentation >Table of Contents >Creating New Structure Definitions Creating New Structure DefinitionsA structure definition is a top-level definition in an EDI Structure: Structure definitions can be created from anywhere in the EDI Structure - that is, context (as shown by cursor placement or focus) does not matter. New structure definitions are placed in the appropriate EDI structure folder, sorted alphanumerically. Creating a new structure definition does not affect existing definitions in the EDI Structure. For information on creating context-specific definitions (code list values, segment references, and similar definitions, see Modifying Existing Definitions. Adding a MessageTo add a message:
1. Right-click any node in the EDI Structure and select New Definition > Message from the shortcut menu.
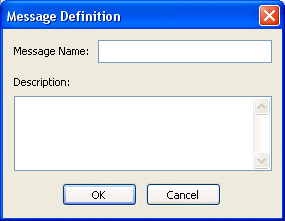
Alternative: Select EDI > New Definition > Message from the Stylus Studio menu. The Message Definition dialog box appears.
2. Enter a message name and, optionally, a description.
3. Click OK.
The message definition is added to the existing transaction messages in the EDI Structure; new messages are sorted in alphanumeric order. Adding a SegmentTo add a segment:
1. Right-click any node in the EDI Structure tree and select New Definition > Segment from the shortcut menu.
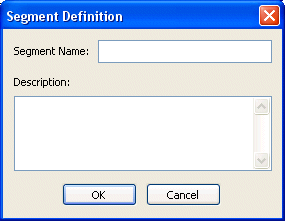
Alternative: Select EDI > New Definition > Segment from the Stylus Studio menu. The Segment Definition dialog box appears.
2. Enter a segment name and, optionally, a description.
3. Click OK.
The segment definition is added to the existing segments in the EDI Structure; new segments are sorted in alphanumeric order. Adding an ElementTo add an element:
1. Right-click any node in the EDI Structure and select New Definition > Element from the shortcut menu.
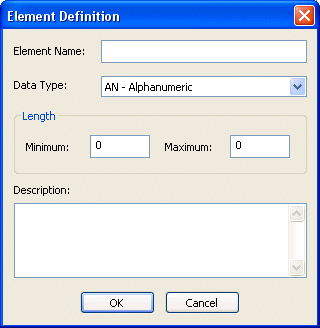
Alternative: Select EDI > New Definition > Element from the Stylus Studio menu. The Element Definition dialog box appears.
2. Enter an element name and specify a data type (the default is AN - Alphanumeric).
3. Optionally specify minimum and maximum lengths and a description.
4. Click OK.
The element definition is added to the existing elements in the EDI Structure; new elements are sorted in alphanumeric order. Adding a CompositeTo add a composite:
1. Right-click any node in the EDI Structure and select New Definition > Composite from the shortcut menu.
Alternative: Select EDI > New Definition > Composite from the Stylus Studio menu. The Composite Definition dialog box appears.
2. Enter a composite name and optionally specify a description.
3. Click OK.
The composite definition is added to the existing composites in the EDI Structure; new composites are sorted in alphanumeric order. Adding a Code ListTo add a code list:
1. Right-click any node in the EDI Structure and select New Definition > Code List from the shortcut menu.
Alternative: Select EDI > New Definition > Code List from the Stylus Studio menu. The Code List Definition dialog box appears.
2. Enter a code list name and click OK.
The code list definition is added to the existing code lists in the EDI Structure; new code lists are sorted in alphanumeric order. See Creating a Code to learn how to add values to a code list. |
XML PRODUCTIVITY THROUGH INNOVATION ™