Cart
Cart
|
Home > Online Product Documentation > Table of Contents > Defining Elements and Attributes in XML Schemas Defining Elements and Attributes in XML Schemas
You can define an element or attribute as part of a complexType. You can also define an element or an attribute as a top-level item. In other words, in the XML document that defines the XML Schema, the element or attribute is a child of the
A global element or attribute cannot This section covers the following topics: Defining Elements That Carry Attributes and Contain Data in XML Schemas
You might want to define an element that carries attributes and contains data, but does not contain subelements. In the
This element has a
Diagram ViewTo define a complex type that contains only attributes:
1. Right-click the
schema node
2. In the shortcut menu, select
Add >
Element.
Alternatives: This operation is also available from the
XMLSchema >
Diagram >
Add > Element menu and from the
Add button
The new element is added to the XML Schema. It is displayed in the diagram and in the text pane (if you have it open). The properties for the new element are displayed in the Properties window.
3. Create a complexType of the element - right-click the element and select
Add > ComplexType.
4. Make sure the new complexType is selected.
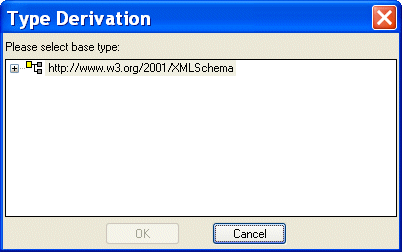
5. Click the
QuickEdit button
The Type Derivation dialog box appears.
6. Expand the W3C XML Schema and select the simpleType on which you want to base the data allowed by the complexType.
7. Click OK.
The XML Schema is updated with the element's new definition.
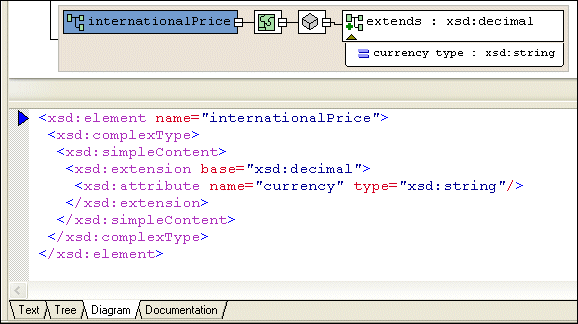
Figure 256 shows an extension of the
The simpleContent node (
8. To add an attribute, right-click the element and select
Add > Attribute.
Tree ViewTo define an element that contains raw data and carries attributes:
1. Click the
Schema node.
2. In the left tool bar, click
New Element Definition
3. Type the name of the element and press Enter twice. If you press Enter once, Stylus Studio displays a pop-up menu that lists the possible types for the new element. You need to define a new type, so you cannot select from this list. If the pop-up menu does appear, press Enter or click outside the menu. You should now have a named element with no type specified.
4. In the left tool bar, click
New complexType
5. In the left tool bar, click
New Content
6. In the drop-down list that appears, double-click
simpleContent. This is the
Content Type property. When the content type is
simpleContent, the complexType you are defining can contain data and attributes. It cannot contain subelements.
7. If you want the contained data to be one of the simpleTypes already defined with no restrictions, click
New Extension
Stylus Studio displays a scrollable, drop-down list of the simpleTypes built in to XML Schema and previously defined in the current schema.
8. If you clicked
New Extension, double-click the type of the data you want this element to contain. Go to
step 9.
If you clicked New Restriction, follow these steps:
a. Double-click the simpleType whose values you want to restrict.
b. In the left tool bar, click
New Facet
c. Double-click the type of facet you want to specify.
d. In the
Properties window, double-click the
Value field.
e. Enter a value for the new facet.
f. To add another facet, click the
restriction node for the simpleType, and repeat
step b.
9. In the left tool bar, click the
complexType node that you created in
step 4.
10. In the left tool bar, click
New Attribute Definition
11. Type a name for the new attribute and press Enter. Stylus Studio displays a scrollable, drop-down list of the possible types for the new attribute.
12. Double-click the attribute type. If you want to, specify a value for the attribute's
Default or
Fixed Value property in the
Properties window.
Defining Elements That Contain Subelements in XML SchemasAn element that contains subelements is a complexType. Consequently, you can define an element that contains subelements in either of the following ways:
To define a complexType that contains elements, see Defining complexTypes That Contain Elements and Attributes - Diagram View or Defining complexTypes That Contain Elements and Attributes - Tree View. Diagram ViewTo define an element and define subelements in the element definition:
1. Right-click the
schema node
2. In the shortcut menu, select
Add >
Element.
Alternatives: This operation is also available from the
XMLSchema >
Diagram >
Add > Element menu and from the
Add button
The new element is added to the XML Schema. It is displayed in the diagram and in the text pane (if you have it open). The properties for the new element are displayed in the Properties window.
3. Right-click the new element and click
QuickEdit. Select one of the following from the
QuickEdit menu:
4. Add subelements to the element you created in
step 3.
Tree ViewIn the Tree view, to define an element and define subelements in the element definition:
1. Click the
Schema node or a
Model Group (
all,
any,
choice,
sequence) node.
2. In the left tool bar, click
New Element Definition
3. Enter the name for your new element. Stylus Studio displays a pop-up menu that lists the built-in simpleTypes and any simple or complexTypes already defined in your schema.
4. Press Enter again. Rather that using a type that is already defined, you want to define a new complexType in the definition of your element. You do not want to assign a type to your new element.
5. In the left tool bar, click
New complexType
6. Enter a name for the new type.
At this point, the procedure for defining a complexType in the definition of an element is the same as defining a complexType as a child of the Schema node. See Defining complexTypes That Contain Elements and Attributes - Tree View. Adding an Identity Constraint to an Element
XML Schemas provide a feature that is similar to the DTD
You associate an identity constraint with an element.
This section covers the following topics: Example of an Identity ConstraintThis topic provides an example of an element with an identity constraint. Introductory information about identity constraints is in Adding an Identity Constraint to an Element. See also Tree View. Suppose you define the following element in an XML Schema:
In an XML document that uses this schema, you could define the following elements:
If you want to enforce that there is just one
The schema validator starts with an initial context set that contains
Diagram ViewTo specify an identity constraint:
1. Right-click the element for which you want to specify the identity constraint.
2. Select
Add > and then
Key,
KeyRef, or
Unique from the menu.
3. Right-click the new identity constraint, and select
Selector.
4. In the
Properties window, specify the XPath expression that identifies the set of elements to which the identity constraint applies.
5. Return to
step 3 and select
Field.
6. In the
Properties window, specify the XPath expression that identifies the element or attribute for each element identified by the
selector element that has to be unique.
Tree ViewThis topic provides the procedure for specifying an element with an identity constraint. Introductory information about identity constraints is in Adding an Identity Constraint to an Element. See also Example of an Identity Constraint. To specify an identity constraint:
1. Click the element for which you want to specify the identity constraint.
2. In the XML Schema left-side tool bar, click
3. In the drop-down list that Stylus Studio displays, double-click
unique,
key, or
keyref.
4. In the
Properties window, double-click the
Name field and enter a name for the identity constraint.
5. If you selected
keyref, then in the
Properties window, double-click the
Refer field and enter the name of the key definition.
6. In the tree representation, click the identity constraint you just defined.
7. In the left tool bar, click
New Selector/Key
8. In the drop-down list that Stylus Studio displays, double-click
selector. You must define exactly one
selector for each identity constraint.
9. In the
Properties window, double-click the
XPath Expression field and enter an XPath expression that returns the element for which you are specifying a constraint.
10. Click the
unique,
key, or
keyref identity constraint you defined in Step 3.
11. In the left tool bar, click
New Selector/Key
12. In the drop-down list that Stylus Studio displays, double-click
field. You must define one or more
fields for each identity constraint. A field can be whatever the XPath expression (defined in the next step) retrieves.
13. In the
Properties window, double-click the
XPath Expression field and enter an XPath expression that returns the element or attribute that is the key or one of the keys for the constraint. XPath expressions associated with fields return the data that define the key for each element returned by the
selector XPath expression.
|
XML PRODUCTIVITY THROUGH INNOVATION ™