Cart
Cart|
Home > Online Product Documentation > Table of Contents > Working with Regions Working with RegionsThis section describes some of the features you can use to work with input file regions. It covers the following topics: Converting the Region TypeThe Region Type field in the Properties window displays information about the type of region Stylus Studio inferred when the file was first read. Its value is either Fixed-Width, Line-Oriented, or Unknown.
Stylus Studio's Convert to XML interprets regions with CR/LF control characters as line-oriented regions. There might be occasions, however, when you want to change the region type from line-oriented to fixed-width, or vice versa. This section describes the tools you can use to change a region from one type to another. Consider the following file fixed-width file:
It is a simple
For display purposes, we can remove the spaces Stylus Studio has inserted for readability (the cells with the light blue shading) by clicking the
Align Fields (
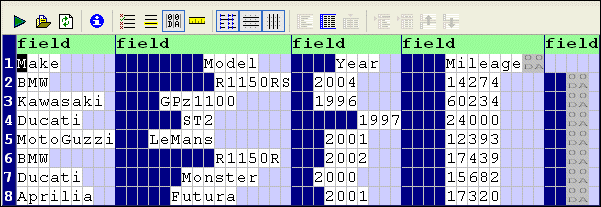
When you convert a line-oriented region to a fixed-width region, Convert to XML removes spaces it added for readability and depicts only the spaces in the original input file used to create the fields and the field values themselves, as show in Figure 166.
By default, Stylus Studio displays fixed-width files using an 80-character row. This accounts for the input files appearance when it is first displayed as a fixed-width file - if you scan the document, you can see that all of the file's original information, including the CR/LF control characters has been retained, but that the formatting differs - the original input file had eight rows; now it has four rows of 80 characters.
How to Convert a Region TypeTo convert a region type:
1. Place the cursor anywhere in the region you want to change.
2. Click the
Convert to Fixed-Width Region (
3. If you have converted a line-oriented region to a fixed-width region, adjust the row length as needed. See
Adjusting Fixed-Width Regions.
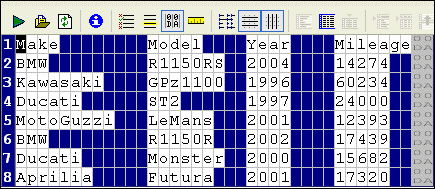
Adjusting Fixed-Width RegionsStylus Studio uses a default row length of 80 characters for fixed-width files. You might need to adjust the row length of a region if your input file uses a different row length, or when converting a line-oriented region, like the one shown in Figure 167, to fixed-width.
There are three ways to specify the row length for a fixed-width region:
ExampleAfter converting the line-oriented region shown in Figure 167 to fixed-width, it looks like this:
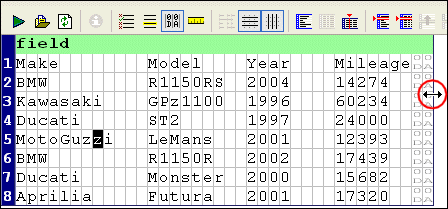
Figure 167 shows the same fixed-width file after it has been resized by dragging the document grid.
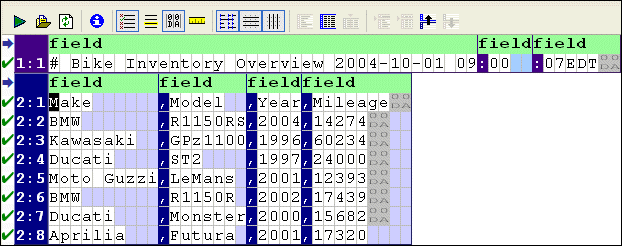
Defining and Joining RegionsAn input file can contain any number of regions; fixed-width and line-oriented regions can exist in the same file. The Convert to XML Editor provides tools that allow you to define new regions and join existing ones. This section covers the following topics: Defining a RegionWhen you define a region in an input file, Stylus Studio splits the region at the current cursor location. The new region starts with the character on which the cursor resided when the region was defined, but it can be of either type - fixed-width or line-oriented - regardless of the type of the original region. Consider the following input file:
By default, Stylus Studio reads this as a file with a single region. You might decide you want your XML to distinguish headers from actual records and treat the two accordingly (not generating headers as XML, for example).
When you define a new region, the Convert to XML Editor renumbers all the rows, using a region:row number format. In addition, each region is displayed with its own field name row, which is displayed in light green with the default field element name,
Field and row values are independent across regions. For example, the
To define a region:
1. Place the cursor in the document grid on the character with which you want to start the new region.
2. Click the
Start New Line-Oriented Region Here (
Stylus Studio defines the new region and renumbers existing regions accordingly. Joining RegionsYou can join regions that you define as well as regions that Stylus Studio interpreted when it first read the input file. You can join the current region to either adjacent region - the previous region, or the next region. The region type after the join operation depends on whether you are joining with the previous region or the next region.The region you are joining assumes the type of the region to which it is being joined.
To join a region:
1. Place the cursor anywhere in the region you want to join with another region.
2. Click the
Join with Previous Region (
Stylus Studio joins the region you specified in step 1with the adjacent region. Controlling Region OutputBy default, Stylus Studio generates output for all fixed-width and line-oriented regions. Unknown regions are never converted to XML. In addition to pattern matching, which controls whether or not individual rows in a region are output based on a pattern you define, you can omit entire regions from output by selecting Yes from the Omit from Output drop-down list in the Region Type section of the Properties window. |
XML PRODUCTIVITY THROUGH INNOVATION ™