Cart
Cart
|
Home > Online Product Documentation > Table of Contents > Updating a Sample Document Using the Grid Tab Updating a Sample Document Using the Grid Tab
This section provides instructions for updating the
A complete list of the videos demonstrating Stylus Studio's features is here: http://www.stylusstudio.com/xml_videos.html. To update XML document using the Grid tab:
1. If it is not already open, open
your-quotes.xml.
See Opening a Sample XML Document if you need help with this step.
2. At the bottom of the XML Editor window, click the
Grid tab.
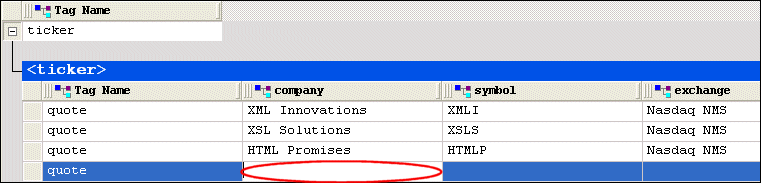
Stylus Studio displays a table that contains the XML data.
The left most column, with the
Tag Name heading, contains the children of the
3. Select the last row by clicking to the left of the last
<quote> element.
The row is highlighted in blue.
4. Click the
Insert row after (
A new instance of the
5. Type
XML Designs and press Enter.
Stylus Studio creates the value for the
6. Press Tab (or use the right arrow key) to move the cursor to the next cell in the row.
8. If you want, you can continue to add the data contained in a
quote element.
|
XML PRODUCTIVITY THROUGH INNOVATION ™