Cart
Cart
|
Home > Online Product Documentation > Table of Contents > Creating Stylesheets That Generate HTML Creating Stylesheets That Generate HTML
The WYSIWYG HTML editor allows you to design stylesheets that generate HTML in a way that is easier than typing all required XSLT instructions.
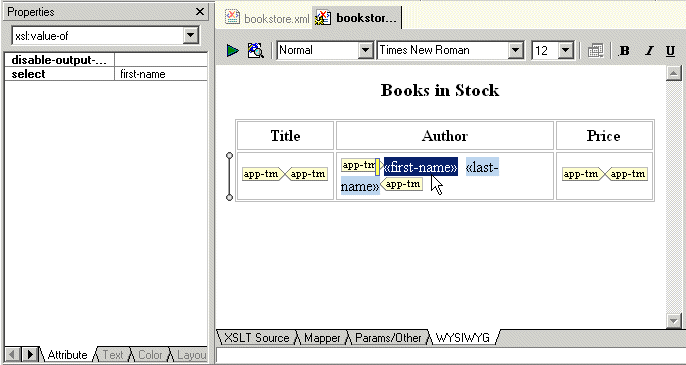
Stylus Studio synchronizes the XSLT Source and WYSIWYG tabs in the XSLT editor. Any updates you make in one tab are automatically reflected in the other tab. This allows you to go back and forth between these two views as needed. You might find that it is easier to insert some XSLT instructions directly, and then return to the WYSIWYG tab. In the WYSIWYG tab, Stylus Studio displays a tree that represents the XML source document that the stylesheet operates on. It is important to note that when the XML source document is associated with a schema, the tree still represents the XML source document. It does not represent the associated schema. The stylesheet that you design in the WYSIWYG tab can generate HTML or XHTML. Consequently, the output method must be HTML or XML. The output method cannot be text or unspecified. This section covers the following topics: Descriptions of WYSIWYG TermsThe following terms are used to describe parts of the WYSIWYG tab:
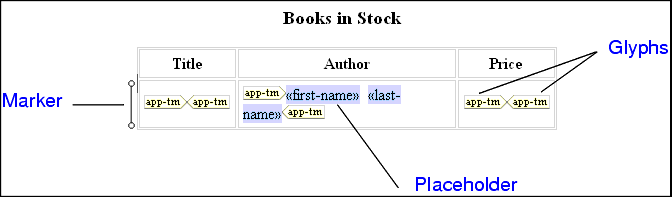
To remove the glyphs, select the enclosed item, and right-click it to display a pop-up menu. Click Unwrap selected element. Inserting Contents in the HTML EditorThe WYSIWYG tab provides an HTML editor that operates as you would expect. You can type text and select it to format it. The usual formatting tools appear in the WYSIWYG tool bar. Select the text you want to operate on and then click the tool that provides the feature you want.
Image Position
Image Position
Displaying a Repeating Element in the HTML Editor
In the source tree diagram, repeating elements are identified by
There are several ways to define a repeating element in the HTML canvas:
When you define a repeating element, Stylus Studio displays a marker (
When you select Add Table from the pop-up menu, Stylus Studio always creates a tables with two columns. You can, of course, delete one of the columns if you do not need it. When you drag a repeating element onto a placeholder that is already a repeating element, Stylus Studio displays a pop-up menu that includes the Reset repeating XPath option. Select this option if you want to reset the context for the repeating element. The new context is the element that you dragged in. Adding Conditional Processing in the HTML EditorConditional processing can be on a single item, a repeating item or a row.
You can then specify whether you want to insert an
Only one branch of a conditional instruction can be active at any one time. Consequently, the HTML canvas might haze or hide glyphs and placeholders. If you want to operate on a placeholder that is not visible, you must change the active branch.
When you specify conditional processing on a table row, a marker (
This section covers the following topics: Specifying Choose Conditional Processing in the HTML Editor
At any point in time only one branch of an
Use the
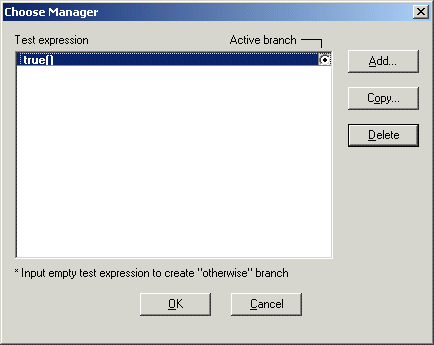
Choose Manager to define the test conditions in the
Choose ManagerTo specify xsl:choose processing:
1. Right click on the placeholder for which you want to define the
xsl:choose instruction.
2. In the shortcut menu that appears, select
Conditional Processing
>
Add Choose. Stylus Studio displays the
Choose Manager dialog box.
3. Click
Copy to define a test condition, which must be an XPath expression. You can define as many conditions as you need. Each condition you add corresponds to an
xsl:when instruction.
4. If you do not need it, select the
true() condition and delete it.
5. To specify an
xsl:otherwise instruction, add a condition and leave it blank.
6. Click
OK.
Stylus Studio creates an
Change active branchTo change the active branch:
1. In the HTML canvas, click a
choose glyph for the active branch you want to change.
Stylus Studio displays the properties for the
2. In the
Properties window, click the
when field.
3. Click the down arrow to display the drop-down menu.
4. Click the branch you want to be active.
For a new
Specifying If Conditional Processing in the HTML EditorTo specify xsl:if conditional processing:
1. Select the placeholder for which you want to define the
xsl:if instruction.
2. In the pop-up menu that appears, select
Conditional Processing
>
Add If. Stylus Studio displays the
Input dialog box.
3. In the
Test Condition field, specify an XPath expression. Stylus Studio evaluates it in the context of the placeholder to which you are adding the
xsl:if instruction.
4. Click
OK.
You can specify multiple
Instantiating Templates in the HTML EditorTo define a template in the WYSIWYG tab:
1. Drag an element or attribute from the source tree and drop it on the HTML canvas.
2. In the pop-up menu that appears, click
xsl:apply-templates.
Stylus Studio creates a template that matches the node you dragged in. You can select the placeholder, and apply formatting. Stylus Studio adds this information to the template. Calling a Named Template
If you have one or more named templates in your stylesheet, or if you want to define a named template, you can add an
To call or create a named template in the WYSIWYG tab:
1. Do one of the following:
2. Click the name of the template you want to instantiate, or click
Create new template to create a new named template.
Specifying Properties and Attributes in the HTML EditorThe Properties window displays the properties for the location you click in the HTML canvas. The immediately visible properties are for the element that directly contains the location you clicked.
In the Properties window, click the down arrow to display a list of the elements that enclose the element that directly contains the location you clicked. The elements are listed from innermost to outermost. Click an element to display its properties. |
XML PRODUCTIVITY THROUGH INNOVATION ™