Home >
Online Product Documentation >
Table of Contents >
Mapping Nodes in Sample Files
Mapping Nodes in Sample Files
This topic is part of a sequence that starts with
Opening the XSLT Mapper.
To define links and examine the stylesheet Stylus Studio creates:
1. In the
Mapper tab, expand the tree for both
books.xml and
catalog.xml.
|
Tip
|
|
You can display an entire tree using the asterisk key (
*) on your keyboard's number pad.
|
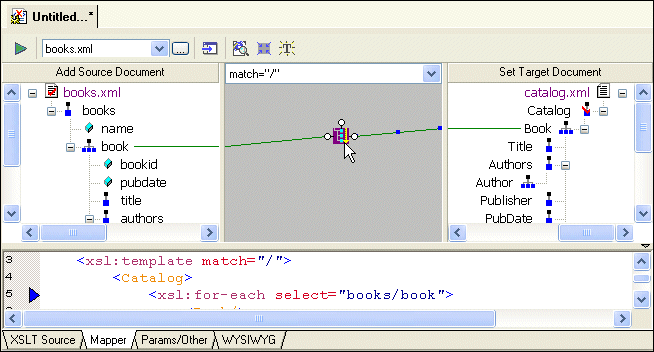
2. In
books.xml, place the pointer over the
book repeating element.
3. Press and hold the left mouse button, and drag from
book to the
Book repeating element in
catalog.xml.
Stylus Studio draws a line as you drag.
4. Release the mouse button to create the link between
book and
Book.
Stylus Studio creates an
xsl:for-each block that links the
book and
Book repeating elements. (If you mouse over the block,
xsl:for-each appears in a pop-up to indicate the XSLT operation represented by the link.)
|
Tip
|
|
If you prefer, you can render
xsl:for-each as a simple line. You might want to do this to simplify the appearance of the mapper canvas. Select
Tools > Options from the menu, and then navigate to
Module Settings > XSLT Editor > Mapper.
|
|
|
Figure 48. xsl:for-each Block Displayed by the XSLT Mapper
Also notice that the complete
xsl:for-each instruction has been added to the XSLT source, which appears in the XSLT source pane under the XSLT Mapper canvas. The back-mapping pointer identifies the line of XSLT that was just added to stylesheet.
The template contains an
xsl:for-each instruction that selects the
book element, which is the node you selected in
step 2. The output from this template is an empty
Book element, which is the node that was the target of the link. Stylus Studio created the
Catalog element automatically, to provide the document structure necessary to support the
Book element.
|
Tip
|
|
By default, Stylus Studio creates an
xsl:value-of instruction when you link one element to another; Stylus Studio creates an
xsl:for-each instruction if you link two repeating elements. You can also create other types of instructions graphically, including
xsl:if,
xsl:choose, and
xsl:apply-template.
|
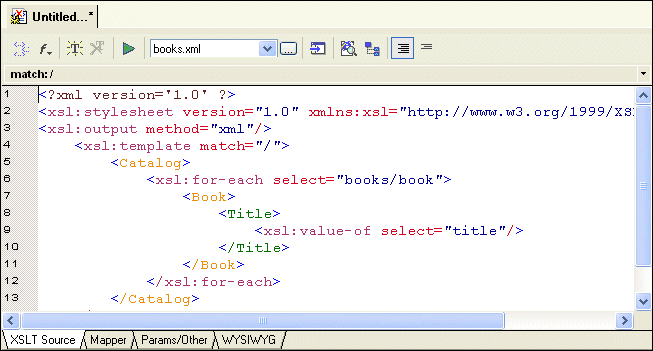
5. Click the
Params/Other tab.
In the
Output method: field, display the drop-down list and click
html. Note, however, that the output of a stylesheet generated by the XSLT Mapper is always XML - even if the setting for
Output method is
unspecified, Stylus Studio still generates XML.
6. Click the
Mapper tab.
The
xsl:output instruction is added to the XSLT source:
|
<xsl:output method="html"/>
|
7. Create another link from the
title element to the
Title element.
|
Note
|
|
When you map, you always map from the source document to the destination document.
|
8. Click the
XSLT Source tab to see the new instructions in the template. (If you prefer, you can simply adjust the splitter between the XSLT source pane and the XSLT Mapper canvas.
|
|
Figure 49. Stylus Studio Builds XSLT Based on the Mapper Links
For each link you define, Stylus Studio adds instructions to the template that matches the root node. In the XSLT you have composed so far, the XSLT inserts a
Book element for each
book element it finds in the source document. In the
Book element, the stylesheet selects the
title elements. For each
title element, it inserts a
Title element. Finally, in each
Title element, the stylesheet extracts the value of the current context node, which is the
title node.
Why does the stylesheet extract the value of the
title nodes but not the
book nodes? The
title node has only a text node as its child. In this situation, the default is that the XSLT Mapper inserts an
xsl:value-of instruction.
 Cart
Cart