Cart
Cart|
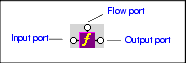
Home > Online Product Documentation > Table of Contents > Processing Source Nodes Processing Source NodesYou can use any of the following to combine nodes or process nodes in the source document and map the result to a node in the target document: XPath Function BlocksStylus Studio supports standard XPath functions defined by the W3C. This section describes how to work with function blocks in XSLT mapper and covers the following topics: Parts of a Function BlockFunction blocks are drawn as a purple block with an italic " f" at its center, and connectors, called ports, placed along the block's border. Input ports (one or more depending on the function) on the left, the flow port at the top, and the output port on the right:
Input portsInput ports are on the left side of the function block. The number and definition of input ports varies from function to function. To specify a value for an input port, you can Flow portFlow ports on the top of function blocks are generally used only when a function is used in a direct link between a source and target node. Output portThe output port is on the right side of the function block. You use the output port to map the function result directly to a target structure element or attribute, or to an IF, condition, or another function block. Types of Function BlocksThe XPath functions available in XSLT mapper include the following: XPath Mathematical FunctionsIn order to simplify the graphical presentation in the XSLT mapper, the following XPath mathematical functions are not graphically represented: You can easily express these functions by typing them in the Value dialog box displayed when you double-click an input port. Creating a Function BlockTo create a function block:
1. In the XSLT editor, in the
Mapper tab, right-click mapper canvas.
2. In the shortcut menu that appears, click
XPath Functions and slide to the submenu.
3. Click the function you want to use. Stylus Studio displays a function block for the function you selected.
Deleting a Function BlockTo delete a function block:Select it and press the Delete key. If the function block is part of a link, deleting the function block also deletes the link. Logical OperatorsThe Stylus Studio XSLT mapper allows you to graphically define the following types of conditions: All condition blocks have two input ports and a single output port, as shown in this example of a greater than block.
You can map the return port to a target structure element or attribute, or to the input port on an XSLT instruction, XPath function, or another condition block. Setting a Text ValueYou can set text values for target structure elements and attributes. You might want to do this if you are composing a mapping whose target structure contains an element or attribute that requires a fixed value, instead of using a value gathered from an input XML document. Example
Here is the XSLT code Stylus Studio generates for the
Stylus Studio displays a red letter T for nodes for which you define a text value:
There are two ways to set a text value: How to Set a Text Value on the Mapper CanvasTo set a text value on the mapper canvas:
1. Right-click on the mapper canvas.
The shortcut menu appears.
2. Select
Text Block from the shortcut menu.
The text block appears on the mapper.
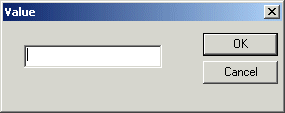
Double-click the text block to display the Value dialog box.
3. Type a value and click
OK.
4. Drag a link from the text block's output port to the target node to which you want to assign the text value.
How to Set a Text Value on the Target NodeTo set a text value on a target node:
1. Right-click the node for which you want to set the text value.
The shortcut menu appears.
2. Select
Set Text Value from the shortcut menu.
The Value dialog box appears.
3. Type the string you want to use as the text value and click
OK.
Defining Java Functions in the XSLT MapperYou can write your own Java functions and use them when you map nodes. To define your own functions:
1. Ensure that a Java virtual machine is running locally.
2. Create the class file for your function. See
About Adding Java Class Files for more help with this step.
3. Display the
Mapper tab in the XSLT editor, if necessary.
4. Right-click the mapper canvas.
5. In the pop-up menu that appears, select
Java Functions > Register Java Extension Class.
6. In the
Java Class Browser dialog box that appears, navigate to and select the Java class that provides your function.
7. Click
OK in the
Java Class Browser dialog box.
Now when you select Java Functions from the mapper short-cut menu, the list of functions includes the function you registered. About Adding Java Class Files
The class file must be in your
|
XML PRODUCTIVITY THROUGH INNOVATION ™