Cart
Cart|
Home > Online Product Documentation > Table of Contents > Working with XSLT Instructions in XSLT Mapper Working with XSLT Instructions in XSLT MapperAs described in Graphical Support for Common XSLT Instructions and Expressions, you can create and work with XSLT instructions in the XSLT mapper using symbols called blocks. Each supported instruction is represented by a different block (symbols distinguish one block from another), and you complete the instruction's definition graphically, using drag and drop. This section identifies the XSLT instructions supported by the mapper, their features, and how to use them. It covers the following topics: What XSLT Instructions Are Represented GraphicallyThe XSLT mapper represents the following XSLT instructions:
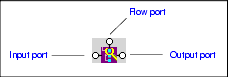
Instruction Block Ports
All XSLT instruction blocks have at least three connectors, called
ports. Look at the
You use these ports to link source and target nodes, to perform processing on source document nodes, and to provide flow control as the result of a
Ports are also part of XPath and Java function blocks, logical operator blocks, and text blocks. (See Processing Source Nodes for information on working with these types of blocks.) Specifying Values for PortsAfter you have added an instruction block to the XSLT mapper, you need to complete its definition. You do this by linking the instruction block's input, output, and, optionally, flow ports to nodes and other blocks in the mapper. The way you specify values for ports varies slightly between input ports and flow and output ports, but, generally speaking, you can either
Understanding Input PortsStylus Studio interprets input ports differently for different XSLT instructions, as shown in Table 35:
Specifying Values for Input PortsYou can specify values for input ports by:
Red Input Ports
If an xsl: instruction's attribute takes a literal or string value (such as
The Flow Port
Output ports for any of the following
You might decide you want a particular
Adding an Instruction Block to the XSLT Mapper
To add an instruction block to the XSLT mapper
1. Right click on the mapper canvas.
The shortcut menu appears.
2. Select
XSLT Instructions from the shortcut menu.
The XSLT Instructions submenu appears.
3. Select the instruction you want to add to your XSLT.
The block for the instruction you selected appears in the mapper canvas.
4. Provide a value for the input port(s). See
Specifying Values for Ports if you need help with this step.
5. Link the output port(s).
6. Optionally, link the flow port.
Notes About Creating Instruction BlocksBe aware of the following when working with XSLT instruction blocks in the XSLT mapper:
If you mouse over the circle, Stylus Studio displays the XSLT represented by the link (
This behavior also exists for text blocks created in the mapper that are not also linked to other blocks in the mapper. See Setting a Text Value. Editing xsl: Instruction Properties
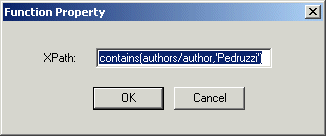
You can change or specify the properties associated with an xsl: instruction by editing the instructions properties. Each xsl: instruction block (and blocks for XPath functions) is associated with a dialog box that allows you to edit its basic properties, like this
Function Property dialog box for the
To edit xsl: instruction properties:
1. Right click on the instruction block whose properties you want to edit.
2. Select
Properties from the shortcut menu.
Stylus Studio displays the properties dialog box for the XSLT instruction or XPath function you selected from the mapper.
3. Edit the XPath expression as required.
4. Click
OK.
xsl:if and xsl:choose
The
Once fully defined, the
If you need to express an else condition, use the
The
If you need to define more than one
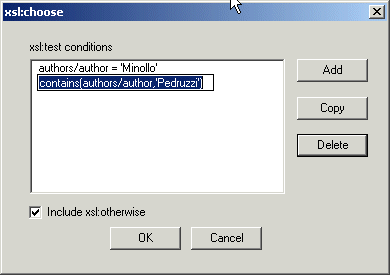
Editing xsl:choose Instruction PropertiesUse this procedure to To edit xsl:choose properties:
1. Right click on the
xsl:choose instruction block.
2. Select
Properties from the shortcut menu.
The
xsl:choose properties dialog box appears. Any attributes already defined for the
3. To add a new attribute, click the
Add button.
A new entry field appears.
4. Replace the default value (
newCondition) with the XPath expression you want to use to define the
test= attribute and press Enter.
5. To delete an existing attribute, select it and then click the
Delete button.
6. If you do not want the
xsl:choose instruction to include the
xsl:otherwise element, click the Include
xsl:otherwise check box to deselect it.
7. When you have finished editing the xsl:choose properties, click
OK.
|
XML PRODUCTIVITY THROUGH INNOVATION ™