Cart
Cart
|
Home >Online Product Documentation >Table of Contents >Diffing Multiple Documents Diffing Multiple DocumentsThis section describes how to use Stylus Studio to diff multiple XML documents. Before continuing with this section, you should read Overview, which describes basic information about the Stylus Studio Diff tool, and The XML Diff Viewer, which describes features of the XML Diff Viewer and how to use them. This section covers the following topics: Document FocusDiffing multiple XML documents is much the same as diffing a pair of documents - you specify the source documents (one at a time), a target document, and Stylus Studio calculates the diff.
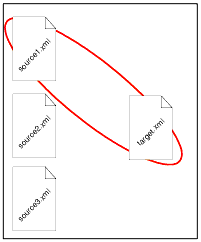
When you diff multiple documents, however, only one source document can have focus at a time. Consider the following illustration, which shows three source documents (
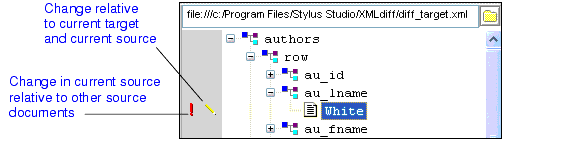
In this example, the When a source document has focus: Symbols Used in the Target Document WindowWhen diffing multiple documents, Stylus Studio uses an additional set of symbols in the target document window. These symbols, which are displayed in the side bar of the XML Diff Viewer window alongside the standard set of symbols described in Symbols and Background Colors, indicate the ways in which the change identified in the current source document differs from changes to the same node in other source documents.
As shown in Figure 138, symbols in the column closest to the document tree identify the changes relative to the currently selected source. Here, the edit symbol (
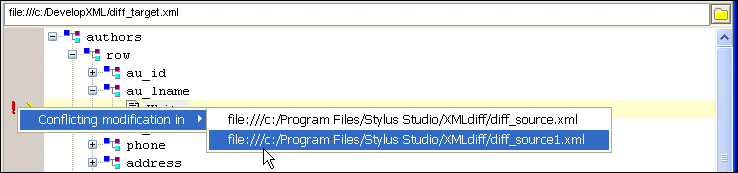
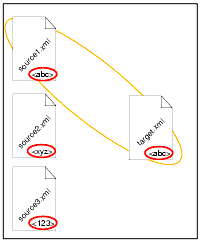
The first column of symbols characterize changes in the currently selected source relative to other source documents. Here, for example, the red exclamation point ( Clicking on a document in this menu changes the current focus to that source document, allowing you to easily navigate to the same node in a different document. The additional symbols used by Stylus Studio when diffing multiple documents are described in Table 18. Consider the example in Figure 140, which illustrates diffing three documents. In this example, the node in question is circled in red. Notice that: Table 19 shows the symbols that might appear based on changing values to the node in question. The example illustrated in Figure 140 is shown in the first row. As values in the source documents change, Stylus Studio changes the diff symbol accordingly.
How to Diff Multiple DocumentsTo diff multiple documents:
1. Select Tools > Options > Show Differences > Files from the Stylus Studio menu.
Stylus Studio displays the XML Diff Viewer.
2. In the source document window, click the add button ( Stylus Studio displays the Open dialog box.
3. Navigate to the document you want to load in the XML Diff Viewer.
4. Click Open.
6. Repeat step 2 through step 4 for the target document, using the set button for the target document window (
By default, Stylus Studio runs the diff calculation automatically when you select the target document. If the default On changes setting has changed, you need to run the diff calculation manually by clicking the Calculate diff button ( |
XML PRODUCTIVITY THROUGH INNOVATION ™