Cart
Cart|
Home > Online Product Documentation > Table of Contents > Building an XQuery Using the Mapper Building an XQuery Using the MapperThis section describes how to build a new XQuery using Stylus Studio's XQuery mapper. This section covers the following topics: Process OverviewThe process of using the XQuery mapper to build a new XQuery consists of the following steps:
1. Create a new XQuery file in Stylus Studio (
File > New > XQuery File).
2. Click the
Mapper tab in the XQuery editor.
3. Add one or more source documents.
4. Specify a target structure.
5. Map source document nodes to target structure nodes. As part of this step, you can optionally define function, FLWOR (For each, Let, Where, Order by, Return), If, and condition blocks to perform actions on source document nodes and map the return value to the target structure node.
6. Optionally, specify an XML document against which you want to test your XQuery.
Stylus Studio uses the information expressed on the Mapper tab to compose an XQuery that returns as its result an XML document that conforms to the structure represented by the target structure you specify. Each of these steps is described in greater detail in the following sections. Working with Existing XQueriesYou can, of course, open an existing XQuery in Stylus Studio. When you do, the XQuery Source page displays the XML used to compose the XQuery, and the Mapper tab displays the source documents, target structure, and source-target mappings that can be inferred from the source XQuery file. All of the procedures described in this section can be performed on new or existing XQuery documents. Source DocumentsIn Stylus Studio, a source document can be an XML document, an XML Schema (XSD), or a document type definition (DTD). The role of a source document is to provide Stylus Studio with a structure that it can use to compose the XQuery, based on how you map individual source document elements and attributes to nodes in the target structure. Stylus Studio infers the structure from the document you specify and displays this structure on the Mapper tab. In this sectionThis section covers the following topics: Choosing Source DocumentsYou can use one or more source documents to build an XQuery in Stylus Studio. You might want to select multiple documents if you need their elements or attributes to fully describe the target structure or the desired XQuery result content, for example.
If you choose an XSD or DTD document, you must also choose an XML instance document to associate with it. Stylus Studio uses the instance document associated with a XSD or DTD source document to generate the XPath
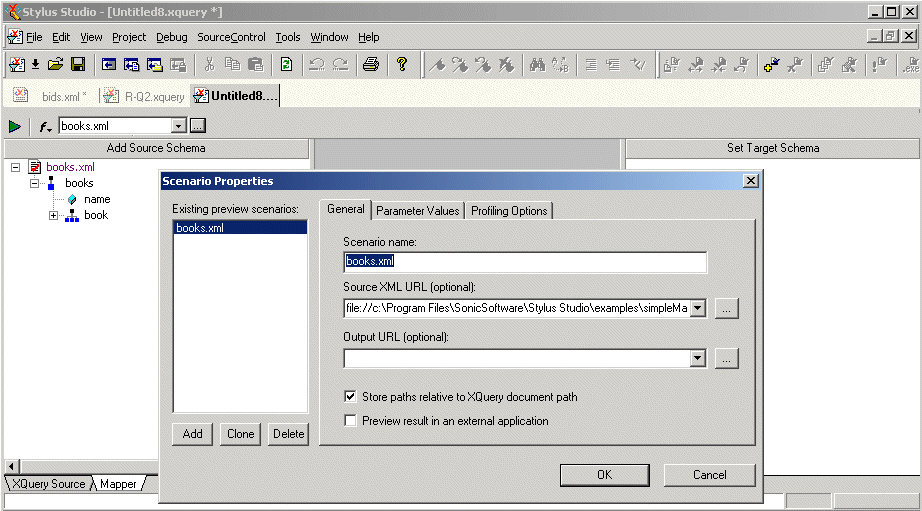
For more informationSee Source Documents and XML Instances to learn more about how Stylus Studio treats source documents. See Creating an XQuery Scenario to learn more about XQuery scenarios. Source Documents and XML InstancesAs described previously, Stylus Studio uses the source document you specify to infer a structure you can use to create mappings to the target structure. In addition to the document structure, Stylus Studio needs document content information in order to compose a complete XQuery. You provide this information by associating a XML instance to each source document you specify. Association typesSource documents can have one of three associations, each of which has implications for the XPath expressions written by Stylus Studio when it composes the XQuery code. A source document can be associated with
The
By default, Stylus Studio uses the first XML document you add to the XQuery mapper as the source XML for the XQuery scenario, as shown here: The document specified in the Source XML URL field on the Scenario Properties dialog box is the document used to preview XQuery results. You can select this association for another XML document if you choose, but only one source document may have this association.
Source document iconsStylus Studio uses different icons to indicate how a source document is associated with the other documents used to compose the XQuery.
How to Change a Source Document AssociationTo change a source document association:
1. Right click the source document whose association you want to change.
The source document shortcut menu appears.
2. Click
Associate With, and then select the document you want to associate with the source document.
How to Add a Source DocumentTo add an XQuery source document to XQuery mapper:
1. Click the
Mapper tab if necessary.
2. Click the
Add Source Document button at the top left of the
Mapper tab.
The Open dialog box appears.
3. Select the document you want to use as the source document for building the XQuery.
4. Click
Open.
If you selected an XML document in step 3, the document appears in the source document pane of the Mapper tab. Go to step 5. If you selected an XSD or DTD document, Stylus Studio displays the Choose Root Element dialog box.
You use this dialog box to associate the XSD or DTD with an XML instance.
a. Select the element from the XSD or DTD document that you want to use as the root element. The
Choose root element drop-down list displays elements defined in the document you selected in
step 3.
b. Use the
Browse (
c. Click
OK.
The document appears in the source document pane of the Mapper tab. Go to step 5.
5. To add another source document, return to
step 2.
How to Remove a Source Document
To remove a source document from XQuery:
1. Remove any maps from the source document to the target schema. (See
Removing Source-Target Map if you need help with this step.)
2. Right click on the source document.
The source document shortcut menu appears.
3. Select
Remove Schema.
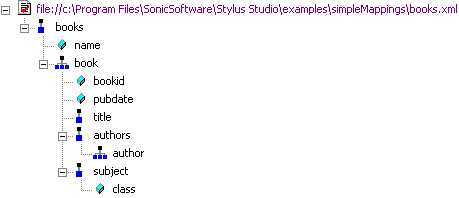
How Source Documents are DisplayedA source document is represented using a page icon, and its name is displayed using a different color to help distinguish it from element and attribute names. The page icon is modified based on the source document's association with other documents. See Source Documents and XML Instances for more information on this topic. By default, only the file name itself is displayed; if you want, you can display the document's full path by selecting Show Full Path on the document's shortcut menu. (Right-click on the document name to display the shortcut menu.)
Source documents are displayed using the tree view; you can use your keyboard's *, +, and - number pad keys to expand and collapse selected documents. Document structure symbolsStylus Studio uses the following symbols to represent nodes in both source and target document structures:
See Source document icons to learn about the different ways source document icons are depicted. Getting source document detailsIf you want details about the document that are not available in tree view, you can open the document by selecting Open from the document's shortcut menu. When you open a document this way, Stylus Studio displays it in its own editor (the XML editor if it is an XML document, for example). Specifying a Target StructureThere are two ways to specify an XQuery target structure:
This section covers the following topics: For more informationSee Modifying the Target Structure to learn about the types of changes you can make to a target structure. Using an Existing DocumentTo use an existing document to provide the XQuery target structure:
1. Click the
Mapper tab if necessary.
2. Click the
Set Target Document button at the top left of the
Mapper tab.
The Open dialog box appears.
3. Select the document you want to use to provide the target structure for defining the XQuery.
4. Click
Open.
The structure of the document you select appears in the target document pane of the Mapper tab. Building a Target StructureTo build a target structure from scratch, you first create a root element, and then define child elements and attributes as needed. How to create a root elementTo create a root element:
1. Click the
Mapper tab if necessary.
2. Right click the area underneath the
Set Target Document button.
The target document shortcut menu appears.
3. Select
Create Root Element.
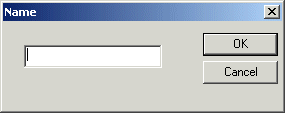
The Name dialog box appears.
4. Type a name for the root element and click
OK.
The root element you specified appears in the target document pane of the Mapper tab.
How to create elements and attributesTo create elements and attributes:
1. Click the
Mapper tab if necessary.
2. Select the attribute or element to which you want to add a child element or attribute. If you have just created a root element, select the root element.
3. Right click the area underneath the
Set Target Document button.
The target document shortcut menu appears.
4. Choose one of the following:
5. Type a name for the node and click
OK.
The node you specified is added to the target structure in the Mapper tab. Modifying the Target StructureThis section describes the techniques you can use to modify the structure and content of an XQuery mapper target structure. It covers the following topics: Adding a NodeSee How to create elements and attributes. Removing a Node
To remove a node from the target structure:
1. Remove any links to the node you want to remove from the target structure. See
Removing Source-Target Map if you need help with this step.
2. Select the node and press the Delete key.
Alternative: Right-click the node and select Remove Node from the shortcut menu. Setting a Text ValueYou can set text values for target structure elements and attributes. You might want to do this if you are composing an XQuery with an element or attribute that requires a fixed value, instead of using a value gathered from an input XML document. Example
Here is the XQuery code Stylus Studio generates for the
Stylus Studio displays a red letter
T for nodes for which you define a text value:
How to set a text valueTo set a text value for a target structure node:
1. Right-click the node for which you want to set the text value.
The shortcut menu appears.
2. Select
Set Text Value from the shortcut menu.
The Value dialog box appears.
3. Type the string you want to use as the text value and click
OK.
Mapping Source and Target Document NodesYou map a source document node to a target structure node using drag and drop to create a link between the two nodes. Stylus Studio composes XQuery code based on these maps. This section covers the following topics: Preserving Mapper LayoutAs you add function blocks to the XQuery mapper, Stylus Studio places them in the center of the mapper canvas. You can change the default placement of function blocks by dragging and drag and dropping them where you like. Stylus Studio preserves the placement you select within and across sessions (as you toggle between the mapper and the XQuery Source tab, for example).
As you use the splitter in the XQuery mapper to widen the source and target document panes, the size of the mapper canvas is reduced. The
Fit in Mapper Canvas button (
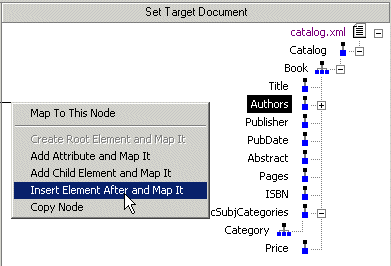
Left and Right Mouse Buttons ExplainedYou can use either the left or the right mouse button to perform the drag and drop operation used to create source-target mappings in XQuery. If you use the left mouse button to perform the drag operation, the link always maps the source node to the target node, one-to-one, without making any changes to the target structure. If you use the right mouse button, Stylus Studio displays a shortcut menu that provides you with alternatives for modifying the target structure.
Using this menu, you can
How to Map NodesTo map nodes:
1. Using either the left or right mouse button, drag the source document element or attribute to the appropriate node on the target structure.
2. When the pointer is on the appropriate target element, release the mouse button to complete the link.
Link Lines ExplainedStylus Studio draws lines for the maps you create from source document nodes to target structure nodes. Different line styles are used to convey information about the XQuery represented by the node mapping. There are three line styles:
The sample files used to illustrate these styles are
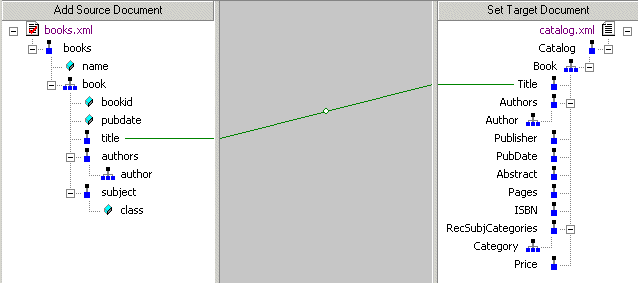
Thin lineA thin line indicates that the XQuery code generated by Stylus Studio copies content from the source node to the target node. Such a line is created when you map one element or attribute to another using the left mouse button, or any of the following choices on the map shortcut menu:
In addition, the structure required to navigate to the node is also generated if it does not already exist in the XQuery. For example, consider the map between the
This map results in Stylus Studio composing the following XQuery code:
The content is expressed as
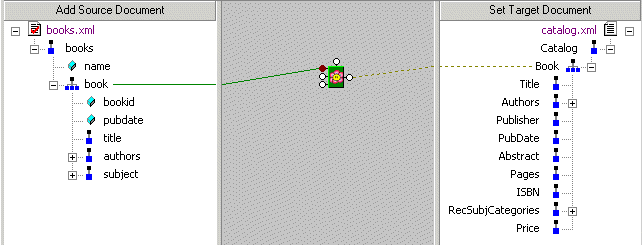
Dashed line
A dashed line indicates that only structure code is being generated. Such a line is created when you use a FLWOR or IF block. For example, consider the map between the
A map involving a FLWOR block results in the following code:
Notice that the FOR loop returns only structure (shown in italics), not content. To add content, we could also map the
Of course, the FLWOR block can be used to define much more complex expressions, involving maps from source document nodes to its WHERE and ORDER BY ports, for example. Thick line
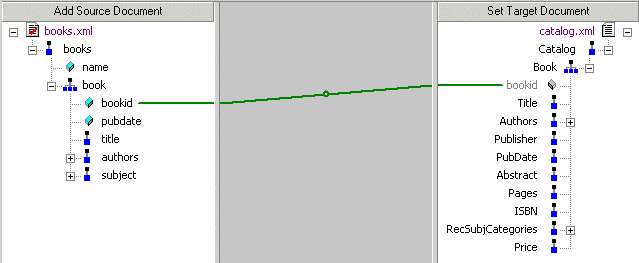
A thick line indicates that the XQuery code generated by Stylus Studio replicates the complete structure and content of the source document node in the target. Such a map is created when you use the
Copy Node choice on the link shortcut menu. Consider the following map - the
For this type of map, Stylus Studio creates the XQuery code required to duplicate the source structure and content in the target, as shown in the following sample:
Notice that the
Removing Source-Target MapTo remove a map from a source document node to a target element node:
1. Select the line that represents the map you want to delete.
2. Press the
Delete key.
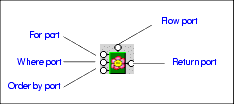
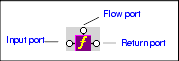
Alternative: Select Delete from the line shortcut menu (right click on the line to display the shortcut menu). FLWOR BlocksThis section describes how to work with FLWOR blocks in the XQuery Mapper tab. It covers the following topics: Parts of a FLWOR BlockFLWOR blocks are drawn as a green block with an illustration of a flower at its center, and five connectors, called ports, placed along the block's border:
For, Order by, and Return ports
You define a FLWOR statement's
Where port
The input for the
Where port must be the output port of another block, such as a condition, IF, or function block. Imagine you have two source documents - you can create an Equal condition block, and specify that the content of an element in one source document must match the content of an element in the other source document, and map the return value of this condition to the
Where port on the FLWOR block. Creating an Equal condition that specifies that the
See IF Blocks and Function Blocks for information on using other types of blocks in XQuery mapper. Flow port
The
Flow port, which is also present on IF and function blocks, allows you to link the result from other FLWOR, IF, and function blocks to define a conditional execution order for your XQuery expressions. You might decide you want a particular
Creating a FLWOR BlockYou can create FLWOR blocks in the XQuery Mapper tab in one of two ways:
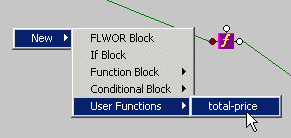
Function BlocksStylus Studio supports standard functions defined by the W3C and any user-defined functions you might have created. This section describes how to work with function blocks in Stylus Studio and covers the following topics: Standard Function Block TypesStylus Studio provides graphic support for the following types of XQuery functions: If a standard function does not provide the functionality you need, create a user-defined function. See User-Defined Functions. Creating a Function BlockThe procedure for creating standard and user-defined function blocks varies slightly: To create a standard function block:
1. Right-click on the mapper canvas.
2. Select
New > Function Block from the shortcut menu. Available functions are displayed in submenu categories.
To create a user-defined function block:
1. Right-click on the mapper canvas.
2. Select
New > User Functions from the shortcut menu.
Any user-defined functions defined in the XQuery source are displayed in a sublist. See User-Defined Functions to learn more about creating user-defined functions in Stylus Studio. Parts of a Function BlockFunction blocks are drawn as a purple block with an italic "f" at its center, and connectors, called ports, placed along the block's border. Input ports (none or more based on the function), the Flow port at the top, and the Return port on the right:
Input portsInput ports are on the left side of the function block. The number and definition of input ports varies from function to function. To specify a value for an input port, drag a source document element or attribute to the port and release it. Flow portFlow ports, on the top of function blocks, are the same for FLWOR, function, and IF blocks. See Flow port. Return portThe Return port is on the right side of the function block. You use the Return port to map the function result directly to a target structure element or attribute, or to a FLWOR, IF, condition, or another function block. User-Defined FunctionsYou can define your own functions in XQuery, such as the following:
This particular user-defined function, which takes an element as its argument and returns a sum of the prices, might be used as follows (shown in italics):
When you create a user-defined function, Stylus Studio adds it to the New > User Functions shortcut menu available when you right-click the mapper canvas.
This makes it easy to reuse a user-defined function on the Mapper tab once it has been defined in the XQuery source. concat Function Blocks
There are three types of concatenation (
Note that only the first two input ports are associated with variables (
IF BlocksIF blocks have a single input port, labeled condition; a Flow port; and two result ports: if then, and if else.
You use IF blocks to compose
This expression, for example, was composed by mapping
IF blocks create a structure if the
Condition BlocksThe Stylus Studio XQuery mapper allows you to graphically define the following types of conditions: All condition blocks have two input ports and a single Return port, as shown in this example of a greater than block.
You can map the Return port to a target structure element or attribute, or to the input port on a FLWOR, function, IF, or another condition block. |
XML PRODUCTIVITY THROUGH INNOVATION ™