Home >
Online Product Documentation >
Table of Contents >
Updating XML Documents Using the Grid
Updating XML Documents Using the Grid
|
|
|
The XML editor
Grid tab is available only in Stylus Studio XML Professional Edition.
|
The
Grid view of an XML document is useful for structured data - it is a convenient way to view and work with documents that contain multiple instances of the same type of element.
|
|
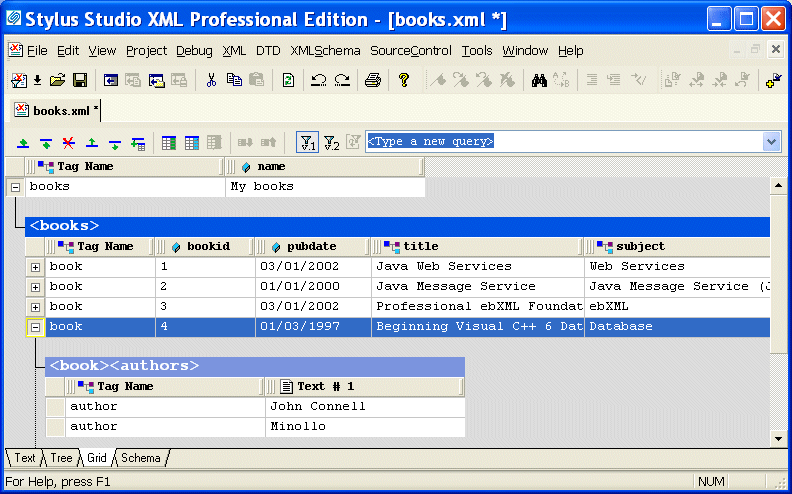
Figure 116. Grid View of books.xml
This section describes the features of the
Grid tab and how to use it to edit XML documents. This section covers the following topics:
Features of the Grid Tab
This section describes the layout and features of the
Grid tab. It covers the following topics:
Layout of the Grid Tab
The
Grid tab consists of a tool bar and a display area. The tool bar has buttons to perform actions and operations on both the grid itself and on the underlying XML document represented in the grid. An example of the former is the ability to show the child elements of the document's root element; they are hidden by default. An example of the latter is the ability to add a new instance of an element or to change a value. These operations are also accessible from the
XML > Grid Editing menu, as well as from the grid shortcut menu (right-click on the grid).
The tool bar also includes a query field, which allows you to enter an XPath expression to query the XML document. Results are displayed in the
Query Output window, which appears when you run the query if it is not already displayed. See
Querying XML Documents Using XPath for more information on this feature.
The display area shows the XML document, both its structure and content, rendered in a tabular, or grid format.
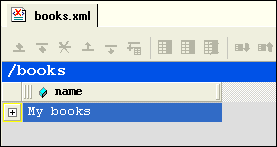
Expanding and Collapsing Nodes
When you first display a document in the
Grid tab, the document is collapsed so that it shows just the root element (here it is
<books>) and its name attribute (
My books), as shown in
Figure 117.
|
|
Figure 117. Default Display - Document Elements Are Collapsed
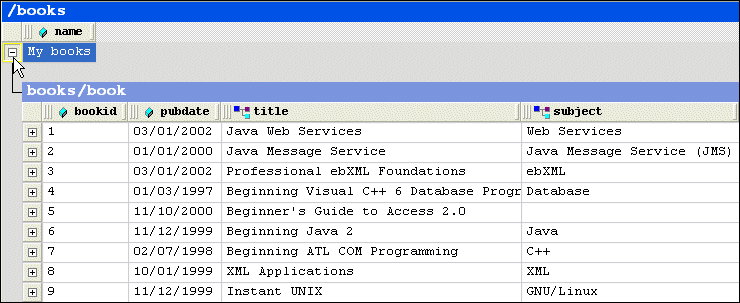
A plus sign displayed to the left of the node name indicates that this node has child nodes. You can click the plus sign to display a subgrid that displays the child nodes, as shown in
Figure 118.
|
|
Figure 118. Click Plus Signs to Expand Collapsed Tables
You can continue to drill down in this fashion to view all values.
To expand a node, click the plus sign (
 ).
).
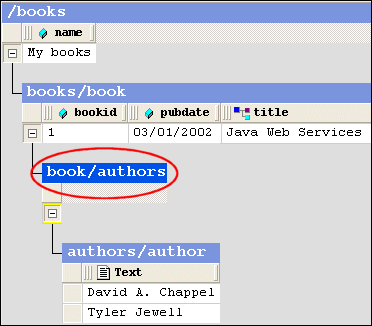
Collapsing Empty Nodes
Some nodes in a document are simply containers - they have no content of their own. An example of a container node is the
<authors> element in
books.xml. The
<authors> element is simply a container for one or more
<author> elements, as shown in this excerpt of
books.xml:
To streamline the display, Stylus Studio hides the tables that represent container nodes. Information about container nodes is displayed in the child node's header.
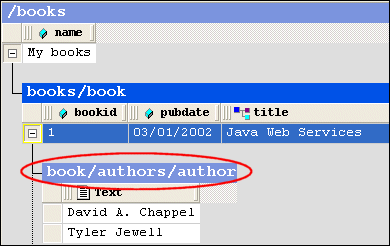
Figure 119 shows the default display for the
author element. Notice that the header,
book/authors/author, contains information about the container node,
authors.
|
|
Figure 119. Table Headers Show Full Path
If you want, however, you can display the tables associated with container nodes, as shown in
Figure 120.
|
|
Figure 120. Container Nodes Are Hidden by Default
The table associated with the
authors node now appears in the grid; it is empty (it has no rows) because it is a container. The elements it contains are displayed in their own table,
authors/author.
To display container nodes, click Simplified View (
 ).
).
This action is also available from the
XML > Grid Editing menu and from the grid shortcut menu.
Renaming Nodes
You can rename container nodes directly in the grid.
To rename a node:
1. Double-click the header that represents the node you want to rename.
The node name is selected.
2. Type the name you want to use for the node.
3. Press Enter (or click elsewhere in the grid or grid background).
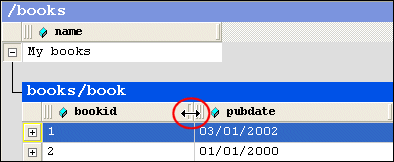
Resizing Columns
When you expand a node, Stylus Studio displays it in uniform columns. You can resize columns to any width you prefer by dragging the handle on the right side of the column header, as shown in
Figure 121.
|
|
Figure 121. Resize Columns by Dragging the Right Handle
To resize a column, drag the handle on the right side of the column header.
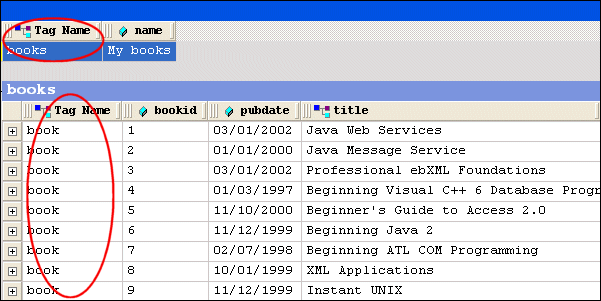
Showing Row Tag Names
In the grid view of a structured XML document, each child element of a node corresponds to a row in a table. For example, the
<books> node of
books.xml contains nine child elements; each row is an instance of the
<book> element. To preserve space in the grid, the tag names of child elements are not displayed as a separate column in the table. Rather, as shown in
Figure 118, this information is displayed in the table header itself.
If you want, you can display the tag name for child elements in their own columns, as shown in
Figure 122.
|
|
Figure 122. Displaying the Root's Child Element
To toggle the display child element names, click Toggle Row Tag Name (
 ).
).
This action is also available from the
XML > Grid Editing menu.
Moving Around the Grid Tab
You can move around the grid using the mouse (click where you want to go) and the keyboard. Keyboard navigation is presented in the following table.
|
Key
|
Action
|
|
Up/Down arrow keys
|
Moves the row highlight in the direction of the arrow key you press.
|
|
Left/Right arrow keys
|
Moves the focus from one cell to the next, in the direction of the arrow key you press.
|
|
Page Up
|
Moves the row highlight to the root node's attribute.
|
|
Page Down
|
Moves the row highlight to the last row in the document.
|
|
Tab
|
Moves the focus forward to the next cell in the row; moves to the first cell of the next row when you hit the last cell in a row.
|
|
Shift + Tab
|
Moves the focus backward to the previous cell in the row; moves to the last cell of the previous row when you hit the first cell in a row.
|
Table 12. Keyboard Navigation in the Grid
Selecting Items in the Grid
When you select a cell in a table:
- The row is selected; you can perform row-oriented actions like changing the row's order in the table. You can also select a row by clicking the plus sign to the left side of the row.
- The column is selected; you can perform column-oriented actions like adding a new column or renaming an existing one.
- The cell gets focus.
|
Tip
|
|
Pressing Enter places a selected cell in Edit mode.
|
How Grid Changes Affect the XML Document
When you make a change to the document structure or content on the
Grid tab, those changes are reflected immediately in the underlying XML document. You can see your changes affect the document on the
Text tab.
Consider the following excerpt from
books.xml.
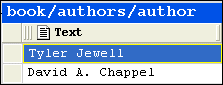
If you move the rows in the authors table, for example, as shown in
Figure 123,
|
|
Figure 123. Moving a Row Affects XML
the underlying XML changes accordingly:
Types of Changes that Affect the Document
The following changes, all of which can be made using
Grid tab, affect the underlying XML document:
- Adding, deleting, reordering rows
- Adding, deleting, reordering, and renaming columns
- Adding, deleting, reordering, and sorting tables
- Changing element and attribute values
- Renaming container elements
Changes you make affect the current instance only. For example, in the example shown in
Figure 123, only that instance of the nested table is affected. If you add a column to
books/book, however, every instance of
books/book gets that new column.
Working with Rows
Stylus Studio provides several features to help you work with table rows in the
Grid tab. Changes you make to tables in the
Grid tab, such as adding a new row or modifying a value, are reflected in the underlying XML document.
This section covers the following topics:
Reordering Rows
You can move rows up and down within the same table. Changes you make to row order affect the element order in the underlying XML document.
To move a row:
1. Select the row you want to move.
2. Click the
Move Up (

) or
Move Down (

) button to move the row to the desired location in the table. These actions are also available from the
XML > Grid Editing menu and from the grid shortcut menu.
Adding and Deleting Rows
You can add and delete rows in a table. Changes you make to the table in this way affect the number of instances of the element in the table. When you add a row, you can insert it in the table above or below the currently selected row.
|
Tip
|
|
You can move rows up and down within a table.
|
To add a row:
1. Select the row next to which you want to insert a new row.
2. Click the
Insert Row Before (

) or
Insert Row After (

) button to add the new row to the table. These actions are also available from the
XML > Grid Editing menu and from the grid shortcut menu.
The row is added to the table.
To delete a row:
1. Select the row you want to delete.
2. Click
Delete (

). This action is also available from the
XML > Grid Editing menu and from the grid shortcut menu.
The row is deleted from the table.
Working with Columns
Stylus Studio provides several features to help you work with table columns in the
Grid tab. Changes you make to tables in the
Grid tab, such as adding a new column or reordering existing columns, are reflected in the underlying XML document.
This section covers the following topics:
Selecting a Column
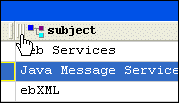
Column operations can be performed when you select any cell in a column. When a cell (and, therefore, its column) is selected, it is highlighted with a yellow outline. As shown in
Figure 124, the
<title> column is selected - the cell containing
Java Message Service is the one that is highlighted.
|
|
Figure 124. Selected Cells are Highlighted in Yellow
To select a column, click any cell in the column you wish to select.
Adding Columns
You can add two types of columns to tables in the
Grid tab - attribute columns and element columns. The procedure for adding both types of columns is the same. When you add a column, it is inserted immediately after the last column of its type. You can move columns after you create them.
To add a column:
1. Select the row in which you want to add a column.
2. Click
Add Attribute Column (

) or
Add Element Column (

). These actions are also available from the
XML > Grid Editing menu and from the grid shortcut menu.
The column is added to the table.
Deleting Columns
To delete a column:
1. Select a cell in the column you want to delete.
A yellow border appears around the cell you select.
2. Click
Delete Column (

). This action is also available from the
XML > Grid Editing menu and from the grid shortcut menu.
The column is deleted from the table.
Reordering Columns
You can reorder columns in the grid by dragging them to the position you desire.
To reorder a column:
1. Place the pointer on the left handle in the column header.
2. Press and hold mouse button one.
The cursor changes shape, as shown here.
|
|
Figure 125. Moving a Column
3. Drag the column to the location in the row you want.
4. Release the mouse button.
The column is placed in the new location within the row.
Renaming Columns
You can rename columns in the grid. This has the effect of renaming the corresponding attribute or element name in the underlying XML document.
|
Note
|
|
You cannot rename the root element from the
Grid tab.
|
To rename a column:
1. Select a cell in the column you want to rename.
A yellow border appears around the cell you select.
2. Click
Rename Column (

). This action is also available from the
XML > Grid Editing menu and from the column shortcut menu.
The column is renamed.
Changing a Value
You can change element and attribute values.
To change a value:
1. Double-click the cell whose value you want to change.
The cell field becomes editable, as shown here.
|
|
Figure 126. Changing a Value
2. Edit the value as required.
3. Press Enter.
Working with Tables
Stylus Studio provides several features to help you work with tables in the
Grid tab. Changes you make to tables in the
Grid tab, such as adding a nested table, are reflected in the underlying XML document.
This section covers the following topics:
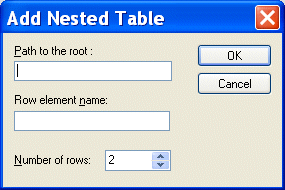
Adding a Nested Table
You add nested tables to a document in the
Grid tab using the
Add Nested Table dialog box, shown in
Figure 127. This dialog box allows you to specify the path to the root for the new table, a row element name, and the number of rows.
|
|
Figure 127. Add Table Dialog Box
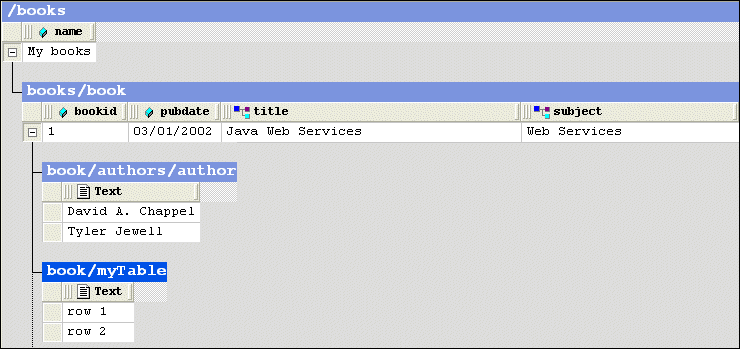
A nested table is created as a child of the current element. The nested table shown in
Figure 128,
myTable, was created as a child of the
<book> element.
|
|
Figure 128. Default Nested Table
Nested tables are created with two default rows, which use the element name you provide in the
Row Element Name field of the
Add Nested Table dialog box. Rows get a default text value of
Row n
text, where n is an incrementing value starting with 1. You specify the number of rows using the
Number of rows field.
To add a nested table:
1. Select the element to which you want to add a nested table.
2. Click
Add Nested Table (

). This action is also available from the
XML > Grid Editing menu and from the grid shortcut menu.
The
Add Nested Table dialog box appears.
3. Optionally, specify the path to the root. If you leave this field blank, the nested table is created as a child of the current element.
4. Enter a row element name.
5. Optionally, change the number of default rows.
6. Click OK.
The nested table is added to the document and appears in the grid.
Moving a Nested Table
You can change the order of nested tables within a row.
To move a nested table:
1. Select the heading of the nested table you want to move.
2. Click the
Move Up (
) or
Move Down (
) button to move the table to the desired location. These actions are also available from the
XML > Grid Editing menu and from the grid shortcut menu.
Deleting a Table
To delete a table:
1. Select the heading of the table you want to delete.
2. Click
Delete (
). This action is also available from the
XML > Grid Editing menu and from the grid shortcut menu.
The table is deleted from the document.
Sorting a Table
You can sort tables on any column in ascending or descending order.
To sort a table:
1. Select a cell in the column on which you want to sort the table.
2. Click the
Sort Ascending (

) or
Sort Descending (

) button to sort the table rows in ascending or descending order, respectively. These actions are also available from the
XML > Grid Editing menu and from the grid shortcut menu.
|
Tip
|
|
You can also display sort options by right-clicking the column heading.
|
The table rows are sorted based on the order you select.
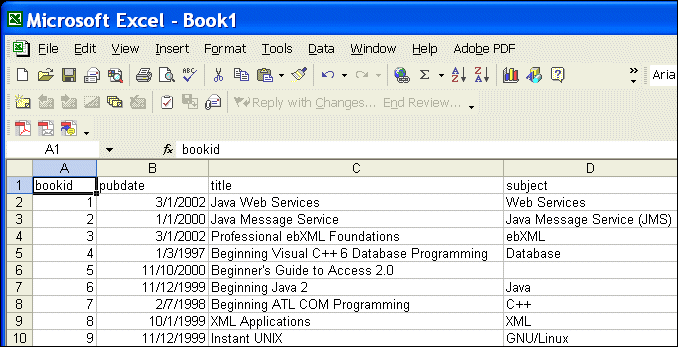
Copying a Table as Tab-Delimited Text
You can copy a tab-delimited text version of a table to the clipboard. This makes it possible to paste document contents from the grid into spreadsheets and other editors that can manage tab-delimited files.
Figure 129 shows
books/book in
books.xml pasted into Microsoft Excel, for example.
|
|
Figure 129. Pasting a Table into a Spreadsheet
Note that when you use this feature, the entire table is copied - column headings (element and attribute names) are not distinguished from cell contents (element and attribute values) in the spreadsheet.
To copy a tab-delimited table to the clipboard:
1. Select the heading of the table you want to copy.
2. Select
XML > Grid Editing > Copy as Tab-Delimited from the menu. This action is also available from the grid shortcut menu.
 Cart
Cart