Cart
Cart
|
Home > Online Product Documentation > Table of Contents > Applying Stylesheets Applying StylesheetsIn order to apply a stylesheet to an XML document, the stylesheet must be associated with a scenario. See If your stylesheet is associated with a scenario, there are two ways to apply it: The following topics provide more information about how to apply stylesheets:
About Applying StylesheetsWhen you apply a stylesheet, Stylus Studio checks both the XML source document and the XSLT stylesheet for correct syntax. If it detects any errors, it displays a message that indicates what the error is. This message appears at the bottom of the XSLT editor. Stylus Studio also displays and flags the line that contains the error. Often, a stylesheet refers to other files, such as CSS stylesheets or images. For Stylus Studio to display the complete result file in the Preview window, you must enter the path for resolving any links. Do this in the Base URL for HTML links resolution field of the Scenario Properties dialog box. Ensure that the correct output type is set. To do this, click the Params/Other tab at the bottom of the stylesheet and check the value of the Output Method field. Multiple scenarios
If your stylesheet is associated with more than one scenario, select the scenario you want to use and then apply the stylesheet. To do this, click the down arrow to the right of the scenario name field to display a list of scenarios. Click the scenario you want to use, and then click
Preview Result
You might want to apply the same stylesheet to two different XML documents and compare the results. To do this, create a scenario for each XML source document. Apply the stylesheet in the context of each scenario. Stylus Studio displays a tab for each scenario at the bottom of the Preview window. Click the tab to display the result document for that scenario.
Stylus Studio does not support scenarios that consecutively apply multiple stylesheets to one source document. However, you can use the
Results of Applying a StylesheetStylus Studio applies the stylesheet to the XML source document specified in the current scenario and refreshes the Preview window with the latest result document. If the Preview window is not visible, select View > Preview from the Stylus Studio menu bar.
To toggle between viewing the text of the result and viewing what the result would look like in a browser, click
Preview in Browser
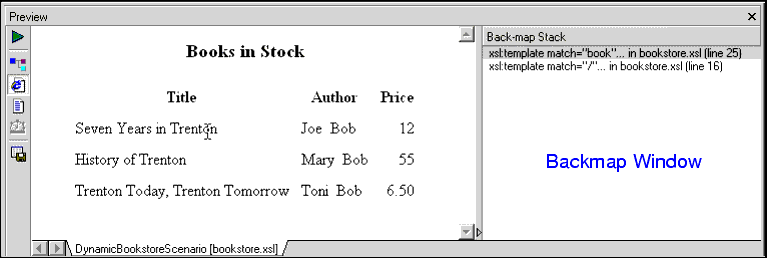
Backmap stack windowIf you click in the result document, Stylus Studio displays the Backmap Stack window, which lists the XSLT instructions that generated the text you clicked.
Stylus Studio also flags the line in the stylesheet that contains the first instruction in the Backmap Stack window. XML Tree view
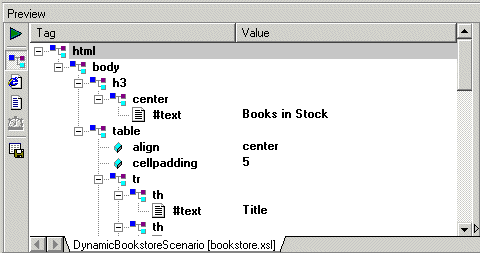
If the result document is XML, in the
Preview window, you can click
Preview in Tree
The tree view provides Savig results
To save the result of applying a stylesheet, click
Save Preview
The result document reflects any changes you made to either the XML source document or the XSLT stylesheet. You do not need to explicitly save either the XML or XSLT file to have changes to those documents appear in the result document. However, when you apply a stylesheet, Stylus Studio does not also save the stylesheet. To save a stylesheet, click
Save
Applying Stylesheets to Large Data SetsWhen you open a stylesheet or assign a source XML document to a scenario, Stylus Studio loads the entire XML source document in memory. Stylus Studio requires the source XML document in order to display If the source XML document is particularly large, loading it can take several minutes. Each time you leave and return to Stylus Studio, Stylus Studio checks whether any open documents have been modified. If the documents reside on remote servers, this can take some time. If you want, you can turn off the check for modified documents. To turn off the check for modified documents:
1. In the Stylus Studio menu bar, select
Tools
>
Options.
Stylus Studio displays the Options dialog box.
2. Click
Application Settings.
3. Click the check box for
Automatically check for externally modified files.
Creating a ScenarioA scenario allows you to preview the results of applying a stylesheet. Each scenario is for a particular group of settings. These settings include the name of an XML source document, the values of any parameters in the stylesheet, and the values of any encoding settings. A scenario can include any setting that you can specify when you apply the stylesheet. A scenario can be associated with only one stylesheet and only one XML source document. However, you can associate any number of scenarios with a stylesheet, and you can associate any number of scenarios with an XML source document.
To create a scenario:
1. In the XSLT editor tool bar, click
Browse
Stylus Studio displays the Scenario Properties dialog box.
2. In the
Scenario Name: field, type the name of the new scenario.
3. In the
Source XML URL: field, type the name of the XML file you want to apply the stylesheet to, or click
Browse
4. In the
Output URL field, optionally type or select the name of the result document you want the stylesheet to generate. If you specify the name of a file that does not exist, Stylus Studio creates it when you apply the stylesheet.
5. In the
Base URL For HTML Links Resolution field, optionally type the path for resolving any links. For example, your stylesheet might have links to CSS stylesheets or images.
6. If you want Stylus Studio to
Store paths relative to XSLT document path, ensure that this option is checked.
7. If you want to
Preview result in an external application, ensure that this option is checked. When this option is checked, Stylus Studio displays the result in the default application for the output method specified for the scenario. For example, if the output method for the scenario is
HTML and if Internet Explorer is the default application for displaying HTML files, Stylus Studio displays the resulting HTML in Internet Explorer, as well as in the
XSLT Preview window.
8. If you want to specify values for stylesheet parameters, click the
Parameter Values tab. Double-click the
Value field for the parameter you want to specify a value for.
9. If you want to use an XSLT processor other than the Stylus Studio processor, click the
Processor tab and type the required information. See
Using Third-Party XSLT Processors.
10. If you want to specify any post-processing, click the
Post-process tab. See
Post-processing Result Documents.
11. To define another scenario, click
Add and enter the information for that scenario. You can also copy scenarios. See
Cloning Scenarios.
12. Click
OK.
For more information, see Scenario Properties General Tab (XSLT). Cloning ScenariosWhen you clone a scenario, Stylus Studio creates a copy of the scenario except for the scenario name. This allows you to make changes to one scenario and then run both to compare the results.
To clone a scenario:
1. Display the stylesheet in the scenario you want to clone.
2. In the XSLT editor tool bar, click
Browse
3. In the
Scenario Properties dialog box, in the
Existing preview scenarios field, click the name of the scenario you want to clone.
4. Click
Clone.
5. In the
Scenario name field, type the name of the new scenario.
6. Change any other scenario properties you want to change. See
Creating a Scenario.
7. Click
OK.
Saving Scenario Meta-InformationStylus Studio can store scenario meta-information in two places:
When you save a stylesheet, Stylus Studio saves the scenario meta-information in the stylesheet, but not in the project. When you select File > Save All or when you save the project, Stylus Studio saves the scenario meta-information in the stylesheet and in the project. To ensure that scenario meta-information in the project and in the stylesheet is consistent Suppose you modify a scenario and save and close the associated stylesheet. If the stylesheet belongs to the open project, when you save the project, Stylus Studio saves the closed stylesheet's scenario meta-information in the project. |
XML PRODUCTIVITY THROUGH INNOVATION ™