|
|
Home > Online Product Documentation > Table of Contents > Registering a Custom File System Registering a Custom File System
This section assumes you have already implemented the custom file system interfaces, compiled, and created a
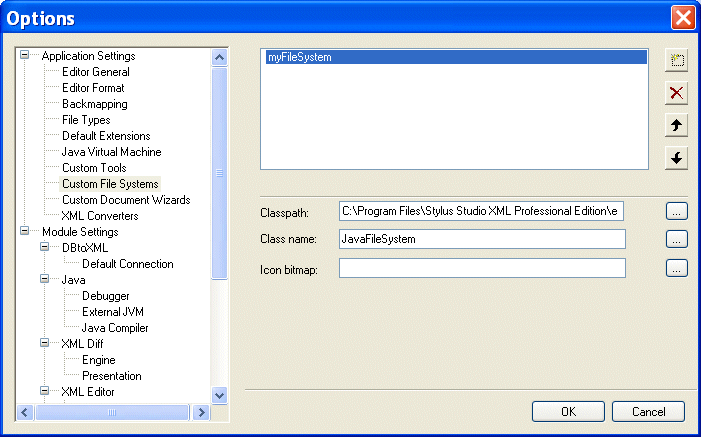
This section covers the following topics: The Custom File Systems PageYou use the Custom File Systems page of the Options dialog box to register a custom file system.
How to DisplayTo display the Custom File Systems page:
1. In the Stylus Studio menu bar, select
Tools > Options.
The Options dialog box appears.
2. If necessary, expand
Application Settings and click
Custom File Systems.
The Custom File Systems page appears. FieldsThe Custom File Systems page of the Options dialog box has the following fields which you need to specify values for in order to register your custom file system. Name
When you click the
New button (
You should replace the default name ( FileSystem1, for example) with the name you want to associate with the custom file system. The name you enter is displayed in Stylus Studio Open, Save, and Save As dialog boxes. ClasspathYou use the Classpath field to specify the required classpath for the custom file system. Class name
You use the
Class name field to specify the name of the custom file system class created using the Stylus Studio custom file system Java API. If you use the
Browse button, Stylus Studio filters the files displayed in the
Java Class Browser dialog box to show only those classes that implement the
Icon bitmap
You use the
Icon bitmap field to specify the icon to associate with the custom file system. This icon appears in the
Open,
Save, and
Save As dialog boxes. If the
Icon bitmap field is left empty, Stylus Studio uses a default icon (
How to Register a Custom File SystemTo register a custom file system:
1. Display the
Custom File Systems page of the
Options dialog box. See
How to Display if you need help with this step.
2. Click the
New button and enter a name for the custom file system. Remember that this value appears in the
Open,
Save, and
Save As dialog boxes along with the icon you select.
3. Specify the classpath and class name.
4. Optionally, specify the icon you want to use to represent the custom file system.
5. Click
OK.
|
XML PRODUCTIVITY THROUGH INNOVATION ™

 Cart
Cart


