Cart
Cart|
|
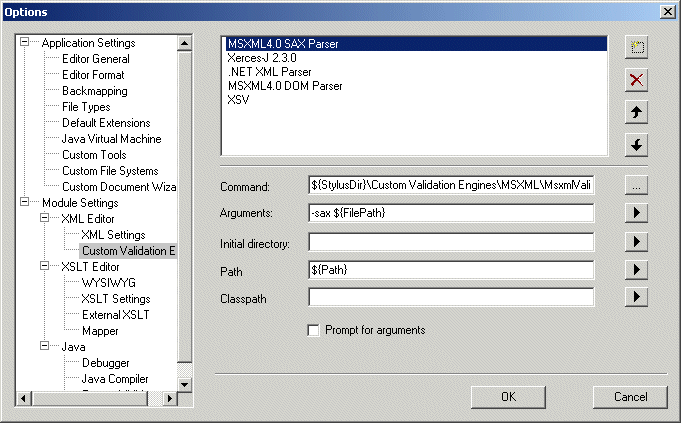
Home > Online Product Documentation > Table of Contents > Configuring a Custom Validation Engine Configuring a Custom Validation EngineThis section provides information and procedures for configuring a custom validation engine. It covers the following topics: The Custom Validation Engines PageYou use the Custom Validation Engines page of the Options dialog box to work with custom validation engines in Stylus Studio.
How to displayTo display the Custom Validation Engines page:
1. In the Stylus Studio menu bar, select
Tools > Options.
The Options dialog box appears.
2. If necessary, expand
Application Settings and click
Custom Validation Engines.
The Custom Validation Engines page appears. About macrosStylus Studio provides macros for some fields to help speed creation of custom validation engines. Any macro you use to configure the custom validation engine is resolved when it is run.
Available macros vary based on the field for which they are being used. To display macros available for a given field, click
Name
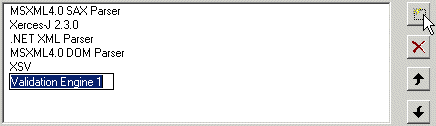
When you click the
New button (
You should replace the default name ( Validation Engine 1, for example) with the name you want to associate with the custom validation engine. The name you enter is displayed in the drop-down in the XML Editor. Custom validation engines are displayed in the Validate Document drop-down list in the order in which they appear here. You can change the custom validation engine order by
1. Selecting the custom validation engine whose order in the list you want to change.
2. Clicking the up or down arrow to the right of the custom validation engine list box as needed.
Command
You use the
Command field to specify the command line used to invoke the custom validation engine. This is typically the path to the
Arguments
You use the
Arguments field to specify any arguments required by the custom validation engine. Click
Initial Directory
You use the
Initial directory field to specify the directory you want Stylus Studio to use as the current directory when the custom validation engine is run. Click
Path
You use the
Path field to define paths to any files (such as
Classpath
You use the
Classpath field to define paths to any JVM files required by the custom validation engine (such as
Prompt for argumentsThe Prompt for arguments feature displays a dialog box when the custom validation engine is run.
The Arguments field allows the user to change the command line and arguments configured with the custom validation engine when it was registered with Stylus Studio. How to Configure a Custom Validation EngineBefore you beginBefore performing this procedure, you should be familiar with the information in The Custom Validation Engines Page. To configure a custom validation engine:
1. Display the
Custom Validation Engines page of the
Options dialog box. See
How to display if you need help with this step.
2. Click the
New button and enter a name for the custom validation engine. Remember that this value is displayed in the
Validate Document drop-down list in the XML Editor.
3. Specify the command line any required arguments. See
Command and
Arguments if you need help with this step.
4. Optionally, specify an initial directory, path and classpath.
5. Click
Prompt for arguments if you want Stylus Studio to display a dialog box that allows the user to change the command line or arguments when the custom validation engine is run.
6. Click
OK.
|
XML PRODUCTIVITY THROUGH INNOVATION ™