Adding Conditional Processing in the HTML Editor

Conditional processing can be on a single item, a repeating item or a row.

  • To specify conditional processing on a single or repeating item, right-click the placeholder and select Conditional Processing from the pop-up menu.
  • To specify conditional processing for an entire row, right-click in the row, and select Conditional Processing (Table Row) from the pop-up menu.

You can then specify whether you want to insert an xsl:choose or xsl:if instruction.

Only one branch of a conditional instruction can be active at any one time. Consequently, the HTML canvas might haze or hide glyphs and placeholders. If you want to operate on a placeholder that is not visible, you must change the active branch.

When you specify conditional processing on a table row, a marker ( ) appears to the left of the table row. You can move the cursor over the marker to display a message that indicates the active branch. Click the marker to display the properties for the active conditional branch associated with the marker your clicked.

This section covers the following topics:

Specifying Choose Conditional Processing in the HTML Editor

At any point in time only one branch of an xsl:choose instruction can appear in the HTML canvas. This is the active branch. When you specify formatting or properties for a branch of an xsl:choose instruction, it applies to only the elements in that branch. When you move the cursor over a choose glyph, Stylus Studio displays a message that specifies which branch is the active branch.

Use the 
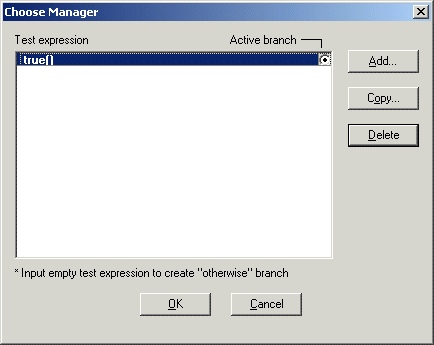
Choose Manager to define the test conditions in the xsl:choose instruction. Use the Properties window to change the active branch.

Choose Manager
To specify xsl:choose processing:
1. Right click on the placeholder for which you want to define the xsl:choose instruction.
2. In the shortcut menu that appears, select Conditional Processing > Add Choose. Stylus Studio displays the Choose Manager dialog box.

Figure 224. Choose Manager Dialog Box
3. Click Copy to define a test condition, which must be an XPath expression. You can define as many conditions as you need. Each condition you add corresponds to an xsl:when instruction.
4. If you do not need it, select the true() condition and delete it.
5. To specify an xsl:otherwise instruction, add a condition and leave it blank.
6. Click OK.

Stylus Studio creates an xsl:choose instruction that wraps the placeholder or row that you selected.

Change active branch
To change the active branch:
1. In the HTML canvas, click a choose glyph for the active branch you want to change.

Stylus Studio displays the properties for the xsl:choose instruction you clicked.

2. In the Properties window, click the when field.
3. Click the down arrow to display the drop-down menu.
4. Click the branch you want to be active.

For a new xsl:choose instruction, the Choose Manager displays one test expression: true(). This is the initial, required, xsl:when instruction.

Tip


Stylus Studio displays only what you can operate on based on the active conditional branch. In other words, if processing at a particular point cannot operate on certain elements, then those elements do not appear in the HTML canvas. If you make an xsl:choose branch active, and the XSLT processor cannot reach it, Stylus Studio displays a false() glyph.

Specifying If Conditional Processing in the HTML Editor

To specify xsl:if conditional processing:
1. Select the placeholder for which you want to define the xsl:if instruction.
2. In the pop-up menu that appears, select Conditional Processing > Add If. Stylus Studio displays the Input dialog box.
3. In the Test Condition field, specify an XPath expression. Stylus Studio evaluates it in the context of the placeholder to which you are adding the xsl:if instruction.
4. Click OK.

You can specify multiple xsl:if instructions on the same placeholder.

XML Whitepapers

Learn how XML can help you meet your business objectives by reading free XML Whitepapers covering XML, XML Schema, XQuery, SQL/XML, and FIXML technolgies employed in real world case studies.

DB2

IBM DB2 is a database management system for powering business applications. Learn how to build XML solutions on DB2 using Stylus Studio's DB2 tools.

Validating EDIFACT Documents with XML Schemas

Either before or after transforming EDIFACT content, generated XML Schemas will make sure that we have all of the necessary components, our codes are all according to the standard codelists, and every little delimiter is in the right place.

XML-DEV Discussion Forum

XML-DEV is a leading technical forum for XML discussion and a valuable free XML learning resource. Subscribe to the XML-DEV email discussion forum today to help further your XML education.

Stylus Most Wanted

 
Free Stylus Studio XML Training:
W3C Member