xsl:if and xsl:choose

The xsl:if instruction cannot express an else condition. It has a single input port, and a single output port, as shown in Figure 196.

Figure 196. xsl:if Instruction Block

Once fully defined, the xsl:if block generates code like the following:

<Review>
               
	<xsl:if test="authors/author= 'Minollo'">
               
		<xsl:value-of select="'Recommended'"/>
               
	</xsl:if>
               
	<xsl:if test="contains(authors/author,'Pedruzzi')">
               
		<xsl:value-of select="'A best buy'"/>
               
	</xsl:if>
               
</Review>


If you need to express an else condition, use the xsl:choose instruction block. This instruction block has two output ports by default, one for the xsl:when test= attribute, and one for the one xsl:otherwise element.

Figure 197. xsl:choose Instruction Block

The xsl:choose instruction block generates code like the following:

<Review>
               
	<xsl:choose>
               
		<xsl:when test="authors/author= 'Minollo'">
               
			<xsl:value-of select="'Recommended'"/>
               
		</xsl:when>
               
		<xsl:when test="contains(authors/author,'Pedruzzi')">
               
			<xsl:value-of select="'authors best buy'"/>
               
		</xsl:when>
               
		<xsl:otherwise>
               
			<xsl:value-of select="'bah...'"/>
               
		</xsl:otherwise>
               
	</xsl:choose>
               
</Review>


If you need to define more than one xsl:when test= attribute, use the xsl:choose properties dialog box for the xsl:choose instruction block.

Note


Stylus Studio generates the xsl:otherwise element by default for all xsl:choose instructions. You can change this setting on the xsl:choose properties dialog box.

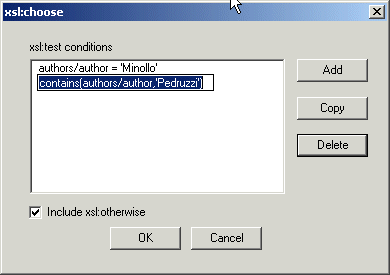
Editing xsl:choose Instruction Properties

Use this procedure to

  • Add, edit, or remove test= attributes from xsl:choose instructions.
  • Edit the setting that generates the xsl:otherwise element.
To edit xsl:choose properties:
1. Right click on the xsl:choose instruction block.
2. Select Properties from the shortcut menu.

The xsl:choose properties dialog box appears. Any attributes already defined for the xsl:choose instruction you are editing are displayed in the xsl:test conditions list box

Figure 198. Properties Dialog Box for xsl:choose

3. To add a new attribute, click the Add button.

A new entry field appears.

4. Replace the default value ( newCondition) with the XPath expression you want to use to define the test= attribute and press Enter.
Tip


Use the Copy button to create a new test= attribute and its nested content that is similar to an existing test= attribute. This feature is especially useful for attributes that are long or complex.

5. To delete an existing attribute, select it and then click the Delete button.
6. If you do not want the xsl:choose instruction to include the xsl:otherwise element, click the Include xsl:otherwise check box to deselect it.
7. When you have finished editing the xsl:choose properties, click OK.

 
Free Stylus Studio XML Training: