|
Home >Online Product Documentation >Table of Contents >Configuring Data Sources Configuring Data SourcesThe source for the information required for the desired report comes from two files: Neither of these files provides data in XML format, so they will have to be converted to XML. We will use built-in DataDirect XML Converters for this task. Ways to Configure Non-XML Data SourcesYou use ConvertToXML nodes to specify a non-XML data source in an XML pipeline. There are two ways to do this:
While both require a similar number of steps, converting a source file can be more economical as it creates a resource that you can reuse in the XML pipeline, and elswhere in Stylus Studio. Both procedures are described in the following sections. Convert booksXML.txt Using a Built-in XML ConverterTo convert booksXML.txt using a built-in XML Converter:
1. Select File > Open from the menu.
The Open dialog box appears.
2. Navigate to the examples\pipeline\order folder where you installed Stylus Studio.
3. Change the Files of type field to All Files.
4. Select booksXML.txt.
5. Select the Open using XML Converter check box at the bottom of the Open dialog box.
6. Click Open.
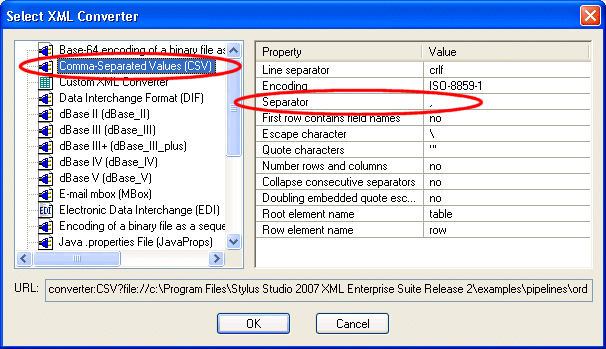
Stylus Studio displays the Select XML Converter dialog box.
7. Select the Comma-Separated Values converter.
The
8. Change the value in the Separator property to a vertical bar (|).
9. Change the value in the First row contains field names to Yes.
10. Click OK.
The
11. Drag booksXML.txt and drop it on the XML pipeline canvas.
Stylus Studio creates a ConvertToXML node with its input port already specified.
12. Go to Create a ConvertToXML Node for order.edi.
Create a ConvertToXML Node for booksXML.txtTo create XML data from a non-XML source in the XML Pipeline Editor:
1. Drag the ConvertToXML icon from the Toolbox pane and drop it on the XML pipeline canvas.
Stylus Studio creates a ConvertToXML node and displays it in the XML pipeline diagram.
2. Display the Properties window (View > Properties) if it is not already open.
3. Display the Project window (View > Project) if it is not already open.
4. Click the input port on the ConvertToXML node.
The properties for the input port are displayed in the Properties window.
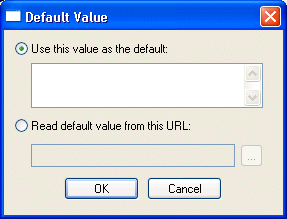
5. Click the Default Value field; click the more button ( Stylus Studio displays the Default Value dialog box.
6. Click the Read default value from this URL radio button, and then navigate to examples\pipelines\order\ folder where you installed Stylus Studio and select booksXML.txt.
7. Click OK.
The input port on the ConvertToXML Node turns green, indicating that a source document has been specified as the input.
Next, we need to specify which built-in converter to use to convert
8. Click the ConvertToXML node in the XML pipeline diagram.
9. Click the XML Converter URL field in the Properties window; click the more button ( Stylus Studio displays the Select XML Converter dialog box.
10. Select the Comma-Separated Values converter.
The
11. Change the value in the Separator property to a vertical bar (|).
12. Change the value in the First row contains field names to Yes.
13. Click OK.
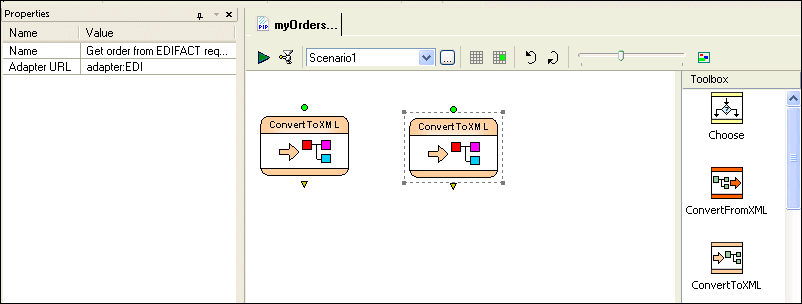
The ConvertToXML node representing the conversion of the Create a ConvertToXML Node for order.edi
Next, using the procedure described in either Convert booksXML.txt Using a Built-in XML Converter or Create a ConvertToXML Node for booksXML.txt, create a ConvertToXML node for the Renaming NodesWhen you add a second node of the same type using the Toolbox, Stylus Studio gives the second node the same name as the first, with a number to make it unique. If you create a node by dragging a document and dropping it on the canvas, Stylus Studio gives the node the same name as the file. Depending on how you created the ConvertToXML nodes in the XML pipeline, they are named either: You can reame nodes using the following procedure: To rename a node:
1. Select the node you want to rename in the XML pipeline diagram.
2. Click the value in the Name field in the Properties window.
3. Type the new name and press Enter.
The XML Pipeline So Far
At this point, we have defined the converters to be used to convert our non-XML data sources to XML. The resulting XML pipeline, In the next stage of the process, we will specify the XQuery file that we will use to join the data from these two files. |
XML PRODUCTIVITY THROUGH INNOVATION ™

 Cart
Cart


