Cart
Cart
|
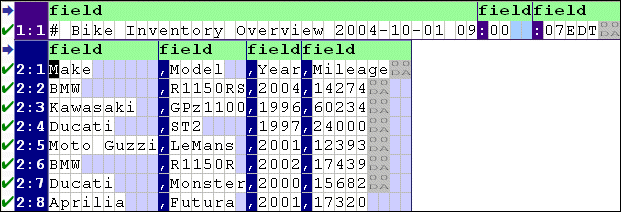
Home >Online Product Documentation >Table of Contents >Defining and Joining Regions Defining and Joining RegionsAn input file can contain any number of regions; fixed-width and line-oriented regions can exist in the same file. The Custom XML Conversion Editor provides tools that allow you to define new regions and join existing ones. This section covers the following topics: Defining a RegionWhen you define a region in an input file, Stylus Studio splits the region at the current cursor location. The new region starts with the character on which the cursor resided when the region was defined, but it can be of either type - fixed-width or line-oriented - regardless of the type of the original region. Consider the following input file: By default, Stylus Studio reads this as a file with a single region. You might decide you want your XML to distinguish headers from actual records and treat the two accordingly (not generating headers as XML, for example).
When you define a new region, the Custom XML Conversion Editor renumbers all the rows, using a region:row number format. In addition, each region is displayed with its own field name row, which is displayed in light green with the default field element name,
Field and row values are independent across regions. For example, the To define a region:
1. Place the cursor in the document pane on the character with which you want to start the new region.
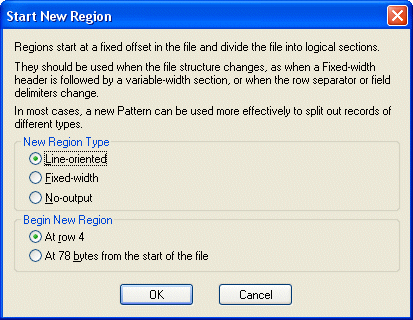
2. Click the Start New Region Here ( Stylus Studio displays the Start New Region dialog box.
3. Choose the type of region you want to create (line-oriented, fixed-width, or no-output).
4. Choose where you want the new region to start (at the current row, or at a specific number of bytes from the start of the file).
5. Click OK.
Joining RegionsYou can join regions that you define as well as regions that Stylus Studio interpreted when it first read the input file. You can join the current region to either adjacent region - the previous region, or the next region. The region type after the join operation depends on whether you are joining with the previous region or the next region.The region you are joining assumes the type of the region to which it is being joined.
To join a region:
1. Place the cursor anywhere in the region you want to join with another region.
2. Click the Join with Previous Region ( Stylus Studio joins the region you specified in step 1with the adjacent region. |
XML PRODUCTIVITY THROUGH INNOVATION ™