Home > Stylus Studio WYSIWYG XSLT Designer Screenshot
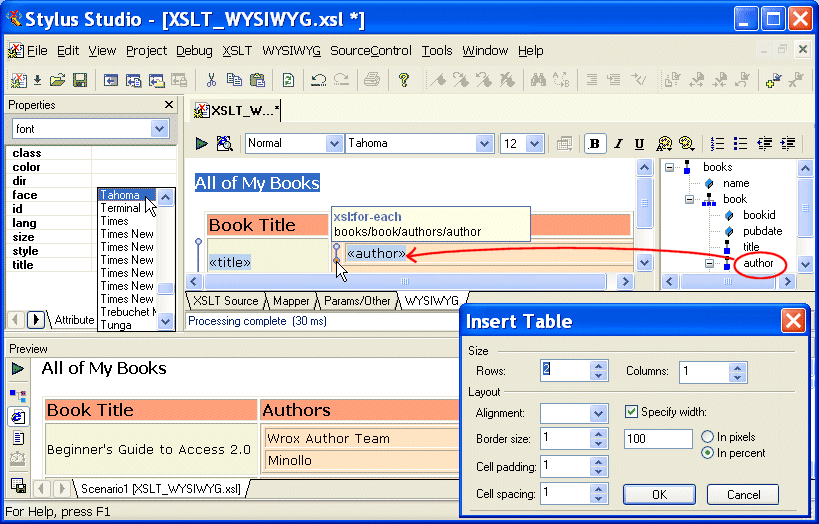
Stylus Studio® WYSIWYG XSLT Designer Screenshot
Stylus Studio®'s WYSIWYG ("What you see is what you get") XSLT Designer lets you create complex XSLT — without writing any code! Using the WYSIWYG XSLT Designer is easy:
- Choose the source XML document on which you want to model your XSLT. Stylus Studio® displays the source document in an intuitive tree diagram on the right side of the XSLT Designer window.
- Drag and drop elements and attributes on the the HTML canvas (the center pane in the XSLT Designer window). When you drop an object on the HTML canvas, Stylus Studio® prompts you for the type of XSLT instruction you want to create — xsl:for-each, xsl:apply-templates, and xsl:value-of are all examples of the types of XSLT instructions Stylus Studio® can automatically generate for you. You can also edit HTML here directly. The HTML toolbar makes it easy to format text and page elements, create tables, insert images, and more.
- Preview the XSLT! Just click the Preview Result button and Stylus Studio® instantly applies the XSLT you have designed to the XML source document on which it is based. Restuls are displayed in the Preview window, using a Web browser by default. You can easily switch to plain text or tree views by clicking a button.
Maybe the best part about the WYSIWYG XSLT Designer is that you can use it to teach yourself XSLT — no matter how detailed or complicated the HTML you design on the HTML pane, the XSLT composed by Stylus Studio® to render XML as HTML is available by clicking the XSLT Source tab. And if you want to tinker with the code while you have the hood open, go right ahead: Stylus Studio®'s editors are synchronized, so changes you make in one are reflected in the other. And Stylus Studio®'s unique back-mapping feature lets you explore your XSLT, line-by-line — just click on an area of interest, and Stylus Studio® shows you the specific line of XSLT that generated the output.


 Cart
Cart


